Okay, so have you ever just had those moments of epiphany, when you’re just sitting there and some perfectly-formed idea pops into your brain? For days, I had been mulling things over–French bread dough…garlic butter…cheese–but I just could NOT figure out the logistics of it all. And then one day, it just came to me and I couldn’t make them fast enough. And they were even better than I imagined.
Don’t get me wrong, this is no health snack–I mean, we’re talking butter AND cheese here (my dietitian friend Emily should probably just avert her eyes now). But oh. My. Gosh. these are so good. And one perk is that one is pretty much enough, so all you have to do is find enough people to help you eat them so you don’t have any leftovers and it’s not TOO bad of a nutritional train wreck!
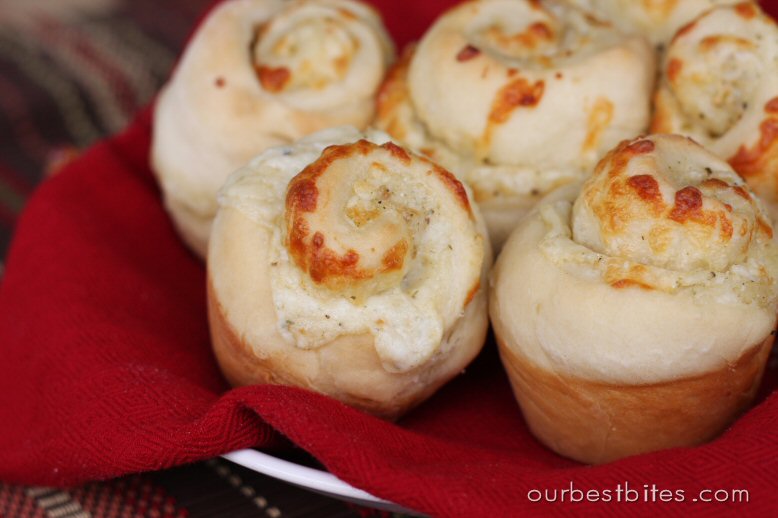
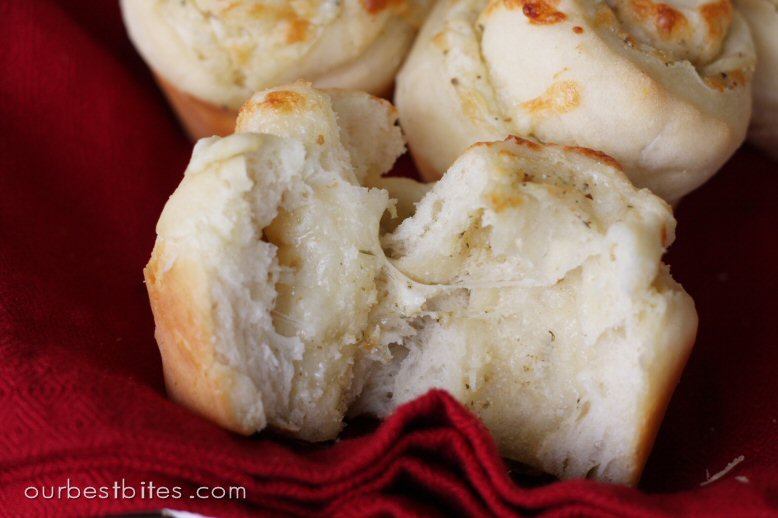
Cheesy Garlic Bread Swirls
Recipe by Our Best Bites
French Bread Dough:
1 Tbsp. yeast
1 1/2 c. warm water
1 1/2 Tbsp. sugar
1 tsp. salt
4-5 1/2 c. flour
3 Tbsp. vegetable oil
1 egg yolk
Garlic Butter:
1/2 c. (1 stick) of real butter, no substitutions
1 1/2 Tbsp. garlic bread seasoning
Shredded mozzarella cheese
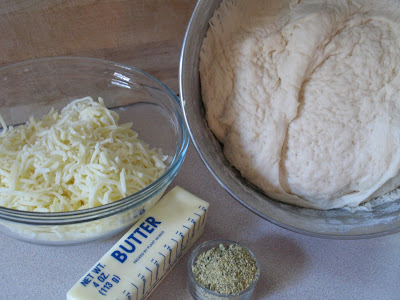
Combine yeast, water, and sugar in large mixing bowl and allow to stand 10 minutes or until bubbly. Add salt, vegetable oil, and egg yolk (set white aside for later) and combine. Add 3 c. flour and mix well until combined. Add enough remaining flour to make a soft dough that barely sticks to your finger. Knead, either by hand or in mixer (my personal and very lazy choice) for another 2-3 minutes. Cover and allow to rise 1 hour.
While dough is rising, combine butter and garlic bread seasoning. Set aside.
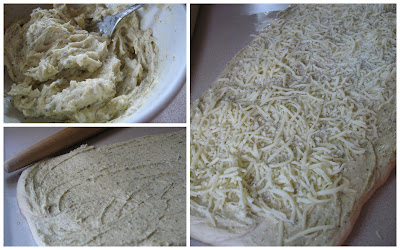
Now…here’s a little trick I’ve been using a lot lately. I really, really hate cleaning up flour on my work surface after I’ve been working with dough, but I obviously have to use SOMETHING to keep it from sticking. If you spray a little non-stick cooking spray on your work surface and your rolling pin, your dough won’t stick and clean-up is super easy!
Anyway, roll your rough into a rectangle that’s about 18-20 inches by 6 inches. Smear garlic butter over the entire surface of the dough and then sprinkle with cheese.
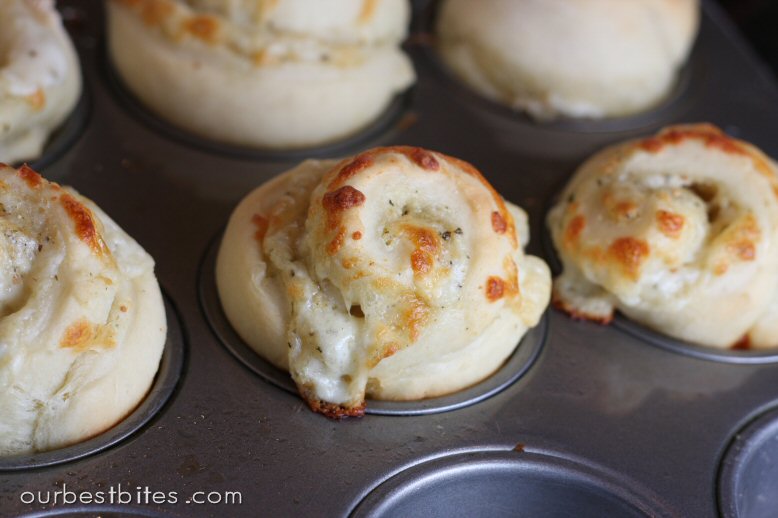
 Roll up jelly-roll style and then use dental floss to cut into 12 equal slices. Of course, I kind of forgot to take pictures of this whole process, but if what I’m saying makes no sense, check out the orange roll recipe to see what I’m talking about. Place each slice in a muffin tin. Cover with a clean cloth. Preheat oven to 350 and allow rolls to rise while the oven is heating.
When the oven is ready, bake for 18-22 minutes.
You’re going to need to keep a CLOSE eye on these puppies during the last 10 minutes or so–once you notice the cheese getting brown, place a sheet of aluminum foil over the rolls (you don’t need to press it down or anything, just lay it on top). This will keep the cheese from burning, although it will get pretty brown on top. It’s okay, though, because the insides are still all ooey-gooey.
Pull these out of the oven and eat ’em up ASAP! If you want to try and counteract the butter/cheese/white flour combo, pair these up with Italian Turkey Soup or dip ’em in some luscious, veggie-filled pasta sauce.
Recipe by Our Best Bites
Ingredients:
French Bread Dough:
1 Tbsp. yeast
1 1/2 c. warm water
1 1/2 Tbsp. sugar
1 tsp. salt
4-5 1/2 c. flour
3 Tbsp. vegetable oil
1 egg yolk
Garlic Butter:
1/2 c. (1 stick) of real butter, no substitutions
1 1/2 Tbsp. garlic bread seasoning
Shredded mozzarella cheese
Instructions:
Combine yeast, water, and sugar in large mixing bowl and allow to stand 10 minutes or until bubbly. Add salt, vegetable oil, and egg yolk (set white aside for later) and combine. Add 3 c. flour and mix well until combined. Add enough remaining flour to make a soft dough that barely sticks to your finger. Knead, either by hand or in mixer (my personal and very lazy choice) for another 2-3 minutes. Cover and allow to rise 1 hour.
While dough is rising, combine butter and garlic bread seasoning. Set aside.
Now…here’s a little trick I’ve been using a lot lately. I really, really hate cleaning up flour on my work surface after I’ve been working with dough, but I obviously have to use SOMETHING to keep it from sticking. If you spray a little non-stick cooking spray on your work surface and your rolling pin, your dough won’t stick and clean-up is super easy!
Anyway, roll your rough into a rectangle that’s about 18-20 inches by 6 inches. Smear garlic butter over the entire surface of the dough and then sprinkle with cheese.
Roll up jelly-roll style and then use dental floss to cut into 12 equal slices. Of course, I kind of forgot to take pictures of this whole process, but if what I’m saying makes no sense, check out the orange roll recipe to see what I’m talking about. Place each slice in a muffin tin. Cover with a clean cloth. Preheat oven to 350 and allow rolls to rise while the oven is heating.
When the oven is ready, bake for 18-22 minutes.


Questions & Reviews
Robbi–Yep, just use regular, rapid rise yeast and all-purpose flour! Hope that helps! 🙂
First, these look great! Thanks! Couple of questions though. 1. what kind of yeast? I'm using rapid rise yeast, would I still use a tablespoon? 2. what kind of flour? I'm assuming all-purpose since it's not stated. But was wondering if I should use bread flour? THANKS, these look great!
I made these for my husband for our Valentine's dinner. They were divine! If carbs weren't so dangerous I would make these all the time! LOL 🙂
These were awesome! Next time I will make a double batch though because we couldn't stop eating them they're so good. I was surprised that they were so easy to make and turned out so nicely, bread never turns out well for me. We had them with the Sunday beef stew.
I made these last week. O. My. WORD.!!!!! There is NOTHING little about these. This was THE BEST thing I have made in a long time. THANK YOU for posting! I did use some granulated garlic and fresh garlic in place of the seasoning, as I wasn't sure what was in your seasoning. YUM!
I wanted to edit this, but ended up deleting it accidentally, but I agree with the poster above me about the grease fire. Its ok though, because my oven was due for a good cleaning anyway and THESE WERE SO WORTH IT!!!
I made these last night to go with a glazed pork tenderloin, zucchini fries, and the asian cabbage salad. The salad was FANTASTIC, the tenderloin was great, but these delicious-sounding things proved problematic, to say the least. I sprayed the muffin pan with non-stick spray… and during the baking of these (and the zucchini fries), the butter spread melted onto the pan… and then dripped down to the bottom of the oven… which started a grease fire, of sorts… and since we are in the process of moving, we didn't have any fire extinguishers on hand. So much for the romantic dinner, but at least it was a memorable first Valentine's Day!
quick question…. I am making these right now, literally in the oven! Just wondering one thing- In the recipe it says to save the egg white for later. I didnt come across the part where is says what to do with the egg white. Can you help? Thanks!
PS- I just ordered your cookbook. I guess I should say, I pre-ordered it. I Cant wait to get it! : )
Shannon
Thanks Kate!
I did make these and too thought they would probably make about 24. Maybe The dough needs to really be punched down? I just had trouble getting them into my regular muffin tins! They were absolutely delicious.. and they are great warmed back up in the microwave the next day. My husband has requested them again for dinner tonight!
Nichelle–You can if you want! It wouldn't hurt anything and it could help if your dough's a little on the soft side.
Fantastic! One question… Do you grease the muffin tin?