 Have you ever known people who are just naturally crafty (*cough* Sara *cough*)? Yeah, I’m so not one of those people. I remember 4H craft activities when I was a kid and other girls would be turning out perfectly painted ceramics and wood cut-outs and mine were…very imaginative (read: ugly). I still draw like a 6-year-old–seriously, someone recently thought a cat I drew had been drawn by my four-year-old son, and fine motor skills aren’t exactly his strength!
I’ve gotten better at crafty things over time–new products and lots and lots and lots of practice make it easier for me to execute the ideas I have in my head without running into problems like humans with no necks or arms that reach mid-calf. Even still, craftiness isn’t really in my blood and if it’s not next-to-impossible to mess up, it’s not for me.
After Sara posted these lanterns at Halloween (inspired by Not So Idle Hands, a FABULOUS craft blog to lose yourself in), I fell in love. They were SO easy and so much fun. At church, I help out with the teenage girls. As soon as I saw Sara’s Halloween lanterns, I knew I wanted to make them with the girls at church, but we couldn’t work it into our schedule before Halloween. I started thinking about Christmas and how FABULOUS little Christmas luminaries would be, so I started playing with my friend’s Cricut and her Christmas Cheer cartridge (which, incidentally, led to me buying my own Cricut on Black Friday–Merry Christmas, Me!!). I cut out a bunch of holiday shapes and we had a fabulous time. Seriously, one of the best activities I’ve been to. The greatest part was that moment when everything had been Mod Podged and was u-g-l-y and then watching it transform into something adorable. Let’s just say that tissue paper, Mod Podge, and ribbon can hide a lot of mistakes… 🙂
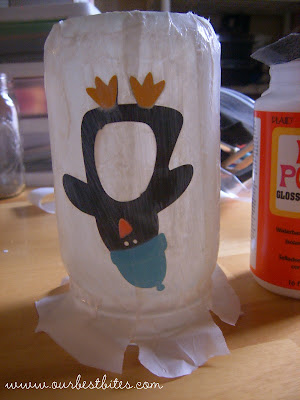
You definitely don’t have to have a Cricut to make Christmas lanterns (although if you know someone who has one, it certainly will make things easier!) If you look at my pictures below, the snowman was not done on a Cricut; that was the one I freehanded and it ended up being the favorite of a lot of people.
Not only do the lanterns themselves make great gifts, but they are great at holding little holiday goodies (like maybe a cellophane bag full of Fruity Candy Popcorn or Peppermint Bag Popcorn or a bunch of Dipped Pretzel Rods). Just include a tea light with your treats and let the lucky recipient know they can use the jar as a lantern when it’s empty.
I’m not exactly re-inventing the wheel here with the instructions–essentially, we’re following the directions for the Halloween lanterns. But I’ll put them over here with a few tips from someone who’s craftily challenged… 🙂
Christmas Lanterns (and Treat Jars!)
Our Best Bites
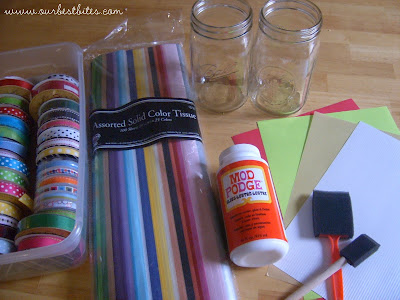
Supplies
–Jars, any size; you can even use empty, glass food jars like pickle or salsa jars. I actually kind of really like them because a) they’re free and b) they’re totally smooth.
–Tissue paper
–Holiday cut-outs. You want to use regular paper or card stock, not tissue paper, for the cut-outs.
–Mod Podge
–Sponge brushes
–Ribbon
Now…for a large Mason jar, you’ll use about 1/2 of a regular sheet of tissue paper. Rip the paper into 2-inch strips. You’ll find that if you tear it one direction, it’ll tear in a relatively straight line and if you tear it in the other direction, it’s a hot mess. Don’t complicate your life–tear it in the easy direction.
If your jar is large enough, place your non-dominant hand inside the jar and paint a thin layer of Mod Podge from the bottom to the top of the outside of the jar–you’re just sticking your hand inside the jar to easily hold and rotate the jar, but no paper or Mod Podge actually goes inside. Don’t worry about Mod Podging the very bottom of the jar–no one’s gonna see it, so there’s no sense in causing yourself all the trouble of having a sticky bottom. Minds out of the gutter, people… 🙂 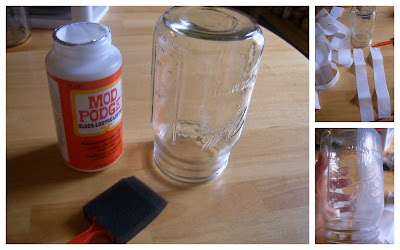
Smooth each 2″ (approximate) strip onto the Mod Podged part of the jar and then repeat until the entire jar is covered in tissue paper. Decide where you want to place the design and then heavily Mod Podge that area. Place the cut-out where you want it and then Mod Podge everything one last time. Figure out which end is least sticky and set it down on that end. Let the jar dry.
 When your jar is dry, trim any excess tissue paper and Mod Podge anything down that needs to be smoothed out. Choose a coordinating ribbon and tie it around the top (great for hiding any awkwardness with the mouth of the jar. I’ll be honest, I’ve made a TON of these things and the mouth of the jar is always awkward for me).
 Drop a tealight in and light ’em up! I’m not sure it could get more festive… 🙂
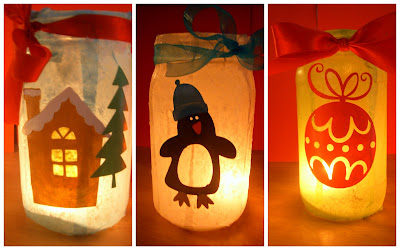
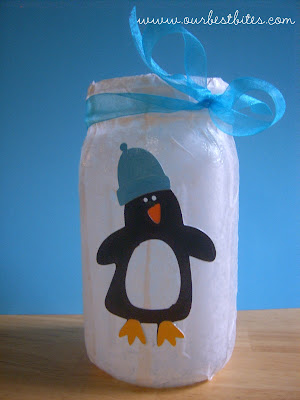
Imagine this little guy, all full of something sweet…
 Now…we’ve gotta talk about the comments. We LOVE that y’all are excited about the blender giveaway, but ONLY comments on the blender post will be counted! If you leave a comment on Facebook, Twitter, or respond to an email, it won’t be counted; if you enter the blender contest on a post other than on the blender post, it will be deleted and NOT counted. We’re REALLY not trying to be rude here, but there are TONS of entries and we MUST have them all in one place. We also have to make sure people aren’t trying to get more than one entry. So please, please, PLEASE don’t enter the contest on this post (or the popcorn post, or any other posts we make this week)–go to the blender post. Comment there. If you comment here, you may be held responsible my trip to the mental hospital (and probably Sara’s too).
Soooo…on a tiny bit awkward (but slightly less-threatening) note, who’s ready to get crafty? 🙂


Questions & Reviews
I am so happy to see a projct w/ mod podge. I just bought some to use for collage & as I read the direstions I noticed it said to use a sealer if I didn't want the tacky/sticky feel. Do I have to use something on top of mod podge? I went to the plaid site & the way I understood, mod podge WAS the seal? I want to use it over paint that is a little rough/dull. I know this is a long post/question, but I'm hoping for some help! I just discovered y our blog & can't wait to make pies in jars( I just saw cupcakes in jars on monday), sugar scrub & buttermilk syrup!! my email is [email protected] if you want to answer me there instead of here. Thanks!
Kate-this is such a cute idea and you did it very well! You should quit beating yourself up for not doing things as well as you think others (cough…Sara) do them. You do great!!! :0)
http://www.gratitudedailydollop.blogspot.com
Emily, they dry pretty fast (depending on how thick your mod podge layer is), but no more than an hour to be solid and few more hours to be completely, completely dry.
How long do these take to dry?
Thanks for the shout-out! SO cute! I LOVE what you did with these! I was getting ready to make some Christmas versions of my Halloween ones….but I may have to make these instead!!! Thanks!!
This is fantasticly amazing! So cute!!!!
Wow, those turned out really cute! What a fun idea. Now I'm thinking of all the other holidays you could do this with. Good job!
Sara – your tip worked for printing out the lantern project. Thank you so much!!
Look at you guys getting all crafty over here! What a sweet project!
Leigh Anne- we're still trying to get that pesky button fixed! Try clicking on the title of the post first. When the page reloads then try the button again and see if it pulls up the right post.