
I have a very distinct memory of being a little girl and watching Cheers with my family. “So what?” you say. “Everyone watched Cheers in the 1980s.” True, but I was a little kid and this is the one scene of all 11 years of Cheers that I remember from my childhood. Anyway, in this scene, Carla is eating a giant piece of pizza like a pro with both her hands. And my dad said, “Now THAT’S how you eat a piece of pizza!” That was ingrained in me at that point and I’ve always believed that everyone should eat pizza like Carla Tortelli.
I’m not saying whether you should eat pizza with your hands or with a knife and fork (although I might think you’re kind of a pansy if you do eat it with a knife and fork!) But I do believe that pizza is a very personal thing and that most of us have pizza memories from as early as we can remember–the way we like it is a combination of personal taste, what we grew up eating, and some of those Cheers-like moments. This sauce and this dough and the methods I’m posting today are a jumping off point; they’re the basics. Not only can you experiment with these recipes and methods and make them you’re own, but you should. The way I do things is the result of many years of getting pizza the way I like it (and, if I do say so myself, the way I think a lot of people like it), but try experimenting with herbs and spices, both in the dough and on the pizza. Try different cheeses, different kinds of sauces, liberally grease a cast-iron skillet with cooking oil and then press the dough into it and up the sides and make your own Chicago deep-dish pizza. Now’s your chance to walk on the wild side…
THE BASIC EQUIPMENT
Pizza Stone. A pizza stone is a heavy, flat “stone,” probably ceramic or earthenware. Due to its ability to retain heat, it replicates the concept of placing pizzas directly into giant brick or clay ovens. It is usually unfinished and thus porous, allowing the flavors from whatever comes in contact with the stone to be absorbed into the stone. Here’s mine:
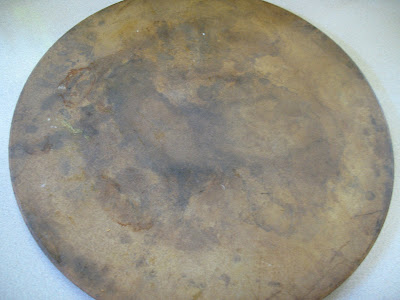 It ain’t pretty, but it’s well-seasoned and happy, turning out flavorful, crispy-crusted pizzas again and again!
Now…the instructions on your pizza stone may tell you to preheat your stone. I’m not going to tell you to ignore the manufacturer’s instructions (okay, so I am), and don’t shoot me if your pizza stone breaks after putting it into a hot oven, but in my experience and my completely non-scientific opinion, I don’t think that 425 degrees is hot enough to shatter your pizza stone as long as it isn’t cold to begin with and as long as it has something on it (like a crust). If you do preheat your stone, you’ll have a heck of a time getting your dough onto the stone in some semblance of a round shape before it starts to cook. Well, you might not have a hard time, but I would; however, I was also dumped by a guy in college because he felt I lacked the physical coordination to cross the plains by foot if necessary. I felt that he was a nutjob.
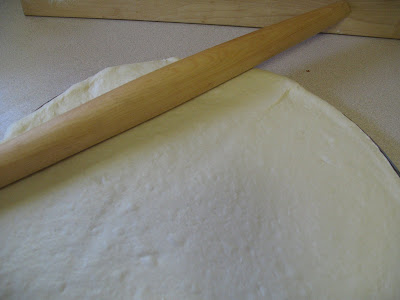
French rolling pin. By no means do you HAVE to have a French rolling pin, but I much, much MUCH prefer my French rolling pin to my traditional rolling pin, especially when I’m working with large quantities of dough or when I’m shaping dough (like for a pizza). Because of the tapered ends, you can hold a tapered end in one hand and press the other tapered end against the dough in order to achieve whatever shape you’re after. Also, because it’s longer, it rolls the entire quantity of dough at one time rather than going back and forth over the dough, hoping that you’re achieving the same thickness.
THE BASIC INGREDIENTS
Dough. No matter what kind of pizza you make, you’ll need dough. I experimented with many different dough recipes and my friend Lisa’s breadstick recipe ended up being my favorite!
I have to admit that I would love to learn to throw dough. But I also think that anyone who knows me personally would know that it would be a bad, bad, BAD idea for me to toss food products into the air. If any of you are more physically coordinated than I am OR if you already have mad dough-throwing skills (or if you just find food in the air fascinating).
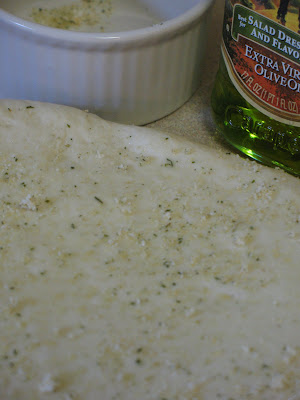
Olive oil; it makes your crust crispy and delicious
Garlic salt; adds to crispy deliciousness. Garlic Bread Seasoning works great too.
Cheese (about 8 ounces, shredded or in deli slices; for most pizzas, I just use Mozzarella)
Dried oregano; this is the “secret ingredient”–everyone will ask you what made your pizza so dang good and this is it! However…use it on your “traditional” pizzas; I don’t think it would be so tasty on a barbecue chicken pizza!
Desired toppings. Whatever you like on pizza! We’re going into greater detail on this later on in the week, but the possibilities of what you can put on pizza are endless! Personally, our default pizza is Canadian bacon and pineapple…

but our secret weapon pizza, especially in pizza pockets (alas, I wish I could talk about pizza pockets today!), is pepperoni, black olives, green peppers, red onions, and pineapple. Mmmmmm…
THE METHOD

1. Begin preparing your dough. Complete steps through the first rise.
2. While dough is rising, prepare your sauce.
3. Preheat your oven (and your pizza stone, if you want) to 425 degrees. While oven is heating, punch down dough and shape into a disc. Spray your work surface, rolling pin, and pizza stone with non-stick cooking spray. Place dough disc onto work surface. Roll and shape into a circle. (Disregard all of this, by the way, if you’re a stinking dough-thrower). Very gently transfer the dough onto your pizza stone and continue to shape up to the edges of the stone.
4. Using a fork, prick several holes in the crust. Drizzle crust with a little olive oil…

and brush all the way up to the edges. Sprinkle with garlic salt. Both oiling and garlic salting the crust help crisp it up, give it a great flavor, and keep it from getting soggy in the middle.
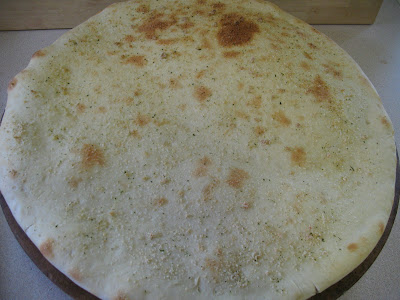
 5. Bake crust in preheated oven for 10-12 minutes or until golden. Remove from oven.
6. Spread a layer of sauce (if desired) over the surface of the crust. Top with whatever toppings you like (I do the flat stuff, i.e. the meat, first). Sara does a layer of cheese first to “glue” on the toppings and then tops with a bit extra after.

7. Return crust to oven and bake 10-12 more minutes or until cheese is melty and the crust is golden brown.
And there you have it. Beautiful pizza, completely non-doughy in the middle, a little crispy on the edges and chewy on the inside.

Go hog wild and let us know how it turns out! And speaking of letting us know, talk to us–what’s your favorite pizza? Do you like it thin and crispy or do you love thick crust? What’s the best pizza you’ve ever had? Did you also have the horrible pizza from a boxed mix growing up? Where did you order cheap pizza when you were in school? What are your favorite pizza memories?


Questions & Reviews
Hello ladies. Can you please repost the dough recipe. I’m in need of good pizza dough:) Thanks
Here you go! 🙂
https://fit-over50.news/2008/04/breadsticks-and-pizza-dough/%3C/a%3E%3C/p%3E
I’ve heard of freezing pizza dough but I never have. When do I freeze it? Before letting it rise? On the day I want to use it, what do I do? thanks
GLUTEN FREE ALERT:
Yes, I tried this with a reliable gluten free flour blend that already has xantham gum in it. It is called Better Batter.
I was surprised at how closely it turned out to yours. I did not get quite the rise that I would have liked, but I think I can get closer if I do it differently. This first time, I had it rise in the oven with the oven light on and it definitely rose but not double the size. So, next time I think I’ll try it in the microwave after I’ve heated a wet towel. GL Flours need the warm moisture in order to rise. I’m also going to try and see if I can get it to rise on the counter top like regular flour but I’m guessing it may not work. Another way is to put it in the fridge for at least 12 hours and see if it rises that way.
Regardless, I made a 3 cheese pizza using this recipe subing in the Better Batter for the flour (I only needed 3 cups – and you have to whisk the flour first and lightly put it in a measuring cup before leveling it off – so it is nice and fluffy) and my husband gave it an 8 out of 10 but only because he wanted more toppings. he said it has been the BEST gluten free pizza crust we’ve had to date. My youngest who has to be gluten free with me ate 2 large pieces and he is only 3. He even talked about it at daycare the next day!
I’ll let you know how my other rising methods work out. Thanks for your recipes!! 🙂
I forgot to add that since it did not rise as much I did not punch it down – so I’m thinking it was very very close to your recipe and soooo yummy! 🙂
One of my favorite pizza memories growing up was that my aunt worked at little ceasars and use to let me eat all of the ingredients in the walk in!!
Wow!! I loved the flavor the oil and garlic salt gave! It was a great starting point and really helped me out 🙂 only thing I changed this time was make it a wheat dough, which was good! I added a little dough enhancer to make it a bit lighter. Anyway! Yum! Thanks! Will use again!!
Have you ever made this recipe with Wheat Flour? Or half White have Wheat? I love the recipe as is.. just wondering!
I’d Try 1/3 – 1/2 wheat. That should work!
Question: Do you let the dough rise again before baking, or just shape and immediately cook after the first rise?
Cook it immediately after the first rise. 🙂
We just barely got into making homemade pizza, and we will never go back! I’m glad I found this recipe to try. Just thought I’d share one of our favorite toppings is pineapple sprinkled with cinnamon. It is divine.
I LOVE this pizza dough! We just had a BBQ chicken pizza tonight with this dough and it was amazing! For anyone looking to add a little whole wheat to the dough I used 1/2c whole wheat flour for every 1c of regular flour and I thought it turned out good. Thank you so much for this site, I have not made a bad recipe yet! You guys are amazing!
Can’t wait to try this pizza, but even more, I’d love an update on the guy who dumped you in college. Yeah, if you can’t even toss a pizza dough – there’s no way you’re makin’ in across those plains. 😉