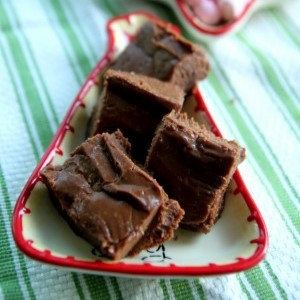
This Creamy Chocolate Fudge has always been one of my favorite holiday treats. Its rich, silky, and packed with deep chocolate flavor in every bite. It’s quick to make, foolproof, and turns out perfectly smooth every time. The marshmallows give it that classic creamy texture, and it sets up beautifully for slicing and sharing. It is so dang easy, not like that temperamental toffee that I can only get to work 1/3 of the time, or time-consuming like wrapping caramels. You can make it in less than a half hour, let it chill in the fridge for up to a couple of days, then cut it into squares and deliver it. Or eat it all yourself.
Ingredients Needed
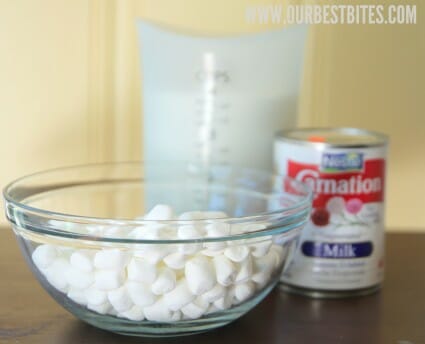
- evaporated milk
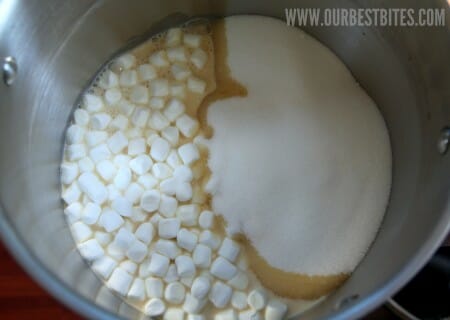
- granulated sugar
- mini marshmallows
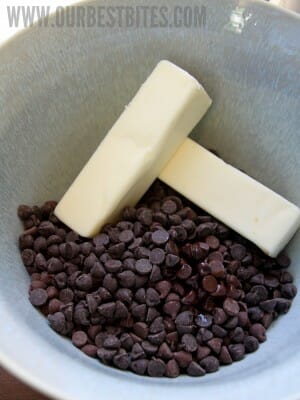
- milk chocolate chips
- semi-sweet chocolate chips
- butter
- vanilla
How to Make Creamy Chocolate Fudge
- Cook milk, sugar, and marshmallows in a saucepan over medium heat until the mixture reaches 240°F, stirring often.
- Line a 9×13 pan with foil, spray with nonstick spray, and set aside.
- In a large bowl, combine butter, chocolate chips, and vanilla.
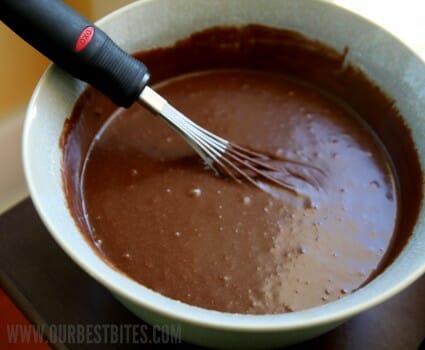
- Pour hot marshmallow mixture over the chocolate mixture and beat until smooth, less glossy, and slightly thickened.
- Spread into the prepared pan, chill until firm, and cut into squares.
Storage & Other Tips
- Remember to calibrate your candy thermometer before beginning. There are people in the comments who had a tough time getting this to set up. The person we got the recipe from chimed in and said she just boils it for ten minutes, and does not use a candy thermometer. Some say they had best luck cooking to 235°F, others needed it to go to 240°F. There are a lot of factors that come into play with any candy recipe, like humidity, sea level, and calibration of your candy thermometer.
- Want to make a double batch? Listen closely. This recipe does not double well. We can’t pinpoint exactly why, but it doesn’t seem to set up quite right when I’ve tried it. We recommend making one batch at a time.
- Marshmallow cream: several people in the comments say they make this exact recipe, but it uses marshmallow cream instead of fresh marshmallows. We aren’t sure of how much cream to add instead of marshmallows, but if you know, let us know in the comments!
- Set it evenly: use high-quality chocolate and don’t rush the mixing step. The mixture should just be starting to lose it’s sheen.
- Line your pan: line your pan with foil overhang and non-stick spray so you can lift the fudge easily and cut clean squares.
- To cut: pull the fudge from the fridge 10 – 15 minutes before serving so it isn’t too hard, making it easier to cut and eat. Use a knife warmed under hot water and wiped dry between cuts for cleaner slices.
- Mix-Ins: For variety, feel free to add mix-ins: chopped nuts, peppermint marshmallows and candy cane chips, swirls of peanut butter, or flavored marshmallows before chilling.
- Storage: store the fudge in an airtight container in the fridge for up to a week. Keep it in the coolest part of the fridge for best texture, and away from other smelly foods, as chocolate tends to absorb odors easily.
- Freezing: you can freeze it for longer storage. Wrap squares between layers of wax or parchment paper so they don’t stick together, and thaw in the fridge before serving.
Frequently Asked Questions
Yes, you can use a smaller or larger pan (adjusting thickness accordingly), or halve the ingredients. The key is mixing well, and set the fudge fully.
Use foil or parchment with overhang so you can lift the fudge out of the pan. Chill fully, and use a sharp knife (warming the blade under hot water, drying it) for clean cuts.
Since the mixture uses marshmallows and chilled thoroughly, it holds it’s shape pretty well. But if your environment is warm, store it in the fridge until serving for best texture.
Yes. Wrap squares between parchment or wax paper, then place in an airtight container and freeze. Thaw in the fridge before serving.


Creamy Chocolate Fudge
Equipment
Ingredients
- 1 12-ounce can evaporated milk
- 4 cups granulated sugar
- 2 ¼ cups mini marshmallows
- 1 12-ounce bag milk chocolate chips
- ½ cup semi-sweet chocolate chips
- 1 cup butter 2 sticks
- 1 teaspoon vanilla
Instructions
- Prepare the butter, chocolate chips, and vanilla in a large glass or metal bowl, or the bowl of your stand mixer. Set aside. (You want this done first, as they need to be added quickly later on.)
- Line a 9×13″ pan with foil and spray it with non-stick cooking spray and set it aside.
- In a large heavy saucepan, combine the milk, sugar, and marshmallows and insert a candy thermometer into the mixture. Cook over medium heat, stirring frequently (constantly at the end) until the temperature reaches 240℉, boiling it for 10 minutes. It should be a nice caramel color and be getting pretty thick. Also be sure to scrape the sides of the pan and remove the residue where the sugar builds up to avoid getting sugar crystals in the mixture.The original creator of this recipe chimed in in our comments. She doesn't use a thermometer, she just boils it for ten minutes. Some readers have had better luck cooking to 235°F, some say they needed it to go to 240°F. There are a lot of factors. Watch the consistency and color if in doubt.
- When the marshmallow mixture is cooked, pour it over the chocolate chip mixture. Beat the mixture with a hand-held electric mixer, your stand mixer, or a hand-held whisk on low speed until the mixture is well-combined, smooth, and just starting to lose its sheen. Pour it into the prepared pan.
- Chill completely in the refrigerator before cutting into 1″ squares.
Notes
- If your fudge turns out too runny, it could be due to all sorts of factors like elevation, humidity, your candy thermometer being even a few degrees off (I would venture to say that most of them are). If you make it again, I would try cooking it to 240.
- Many comments said this recipe has been a family staple for a long time, but they use marshmallow cream instead of fresh marshmallows. I’m not sure of how much cream to put in, but feel free to give it a try! If you do, let us know how it went!
- Use peppermint marshmallows and top with chopped Andes mints for peppermint fudge.
- Use 1/2 chocolate chips and 1/2 peanut butter chips (in 2 separate bowls) and then swirl the two mixtures together for peanut butter fudge.
- Add 1 1/2 cups chopped walnuts or pecans.
- Top with chopped walnuts or pecans and marshmallows for rocky road fudge.


Questions & Reviews
Ummm….wow. This fudge turned out perfectly and so delicious! I was nervous because of all of the comments about it not setting up, but we had no trouble at all! We made sure to cook it over medium heat until it reached 240 (it boiled for 15 minutes and ended up being a light caramel color). It took about 5 minutes to mix it (on a low-medium speed) in my KitchenAid until it “lost its sheen”–though I wasn’t really sure it ever did. :/ As long as I was mixing it, it still looked shiny, but when it was still, it looked a little dull, so I decided to call it good. We live in the Salt Lake Valley (UT), in case people are wondering about the elevation. Hope some of this info helps someone! And a big THANK YOU for this fabulous recipe!! I just love you ladies! Merry Christmas!
Did you make more than one batch at once? Because every time I’ve done that, it’s never set up right. 🙁 I should have included that in the directions. If not, your candy thermometer may have been off (it’s a very common problem–most candy thermometers are off by at least a few degrees).
I have my own little turkey due in june- which is why I’m just now busting out neighbor gifts (three days before christmas!!) thank you for an easy breezy fudge recipe. merry christmas- and may your (our 🙂 second trimester be SO much better than round one!
One thing that would be nice to have on the recipe though is the approximate amount of time to beat the fudge. I had no idea how it should look as it became less glossy. I had to refer to another cookbook and follow the beating directions there. I still wasn’t sure whether it was going to work out right.
I made this today but with all semi-sweet choco chips. It turned out perfectly and was SOOO delish!
Cross your fingers! I made this fudge tonight (first time fudge maker.) And since I myself am a procrastinator, if it does not work out this will be the first time I have not sent in a treat for my children’s holiday party. But the batter tasted good. The second batch was much easier to make than the first. I have a question, How long do you normally mix the end result before it starts to lose its sheen? My kitchen is dark and it was hard to tell.
Thanks for the recipe and congrats on the baby.
It turned out perfectly. Huge hit with the kids and teachers at school and my hubby likes it too. We are going to try to make different flavors this weekend. Thanks for the recipe.
I made this fudge and it is the best chocolate fudge I’ve ever had! Seriously…I love it! Thank You for this recipe! :o)
Sorry, I didn’t read all of the comments before I posted mine and now I see that a handful of folks had trouble w/ goopeyness! Maybe I’ll put it into jars as one woman suggested? Thanks!
I was reading the comments about the temperature–I learned from a candy making expert in my ward that the temp in most recipes is based off of sea level boiling point, which is 212. She said that you need to figure out at what temp water boils in your area (by sticking a candy thermometer in boiling water) and then adjust the temp in the recipe to that. So water boils at 206 (6 degrees below what it does at sea level) where I live, so I subtract 6 degrees from the temp the recipe says. So for this recipe I took it to 234 instead of 240 and mine turned out perfectly. I don’t know how exact you have to be, but from what she said it seems like it’s pretty exact. I hope that helps. I’m not an expert at candy making, but this lady is and that’s what she said to do, so I followed it and my stuff has been turning out great!
Made this yesterday and thought I had ruined it completely! I was cooking it and the bottom started burning even though I was stirring constantly. I was so bugged and stressed and thought it was going to fail, but I tried anyway and it seriously turned out perfectly despite the little bits that came off the bottom! And I think I scraped the sides too, but it was the creamiest, yummiest fudge I think I’ve had. Everyone loved it and couldn’t stop eating it. I got so many comments about how great it was. My husband said it was the best he’s ever had and he liked it even better than oreo balls (if you’ve had those-they are delish!). I made the mint variety with peppermint extract and Andes mints on top. Soooo stinkin’ good! Thanks for the recipe!