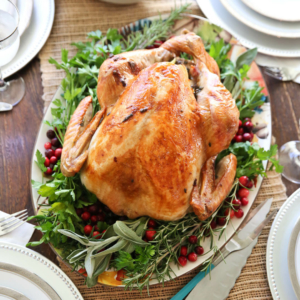
For all of you who are making the big Thanksgiving turkey or thinking of making the turkey or dreaming of making the turkey, this one’s for you–the OBB turkey that people fall in love with year after year.
We know that Thanksgiving is not the time when people generally go and start experimenting with other peoples’ recipes. One of the reasons why we do what we do is because we feel like we can express love to those we care about through food and food-related traditions, and those food-related traditions are never stronger than during the holiday season.
There are some common complaints out there about turkey. First, it can be dry and flavorless. Second, it can taste gamey. Third, if it’s not overcooked, you run the risk of under-cooking the turkey, especially when you’ve got large quantities of light and dark meat involved.
The solution? Brining the turkey overnight and then injecting it (literally – using one of these) with chicken broth, butter, and garlic for flavor and moisture, then using an oven bag to ensure that it’s evenly cooked and moist. The result? A super-flavorful, super-moist Thanksgiving turkey.
Ingredients and Supplies Needed
This is just a preview of ingredients and method, keep scrolling for full printable recipe.
Ingredients
Turkey & Brine
- Turkey
- Size Matters– When it comes to your turkey, bigger isn’t always better. Or ever, actually. A big turkey is super impressive, but I wouldn’t buy a turkey larger than 12-14 pounds; if you need more turkey, just buy another one or buy a bone-in breast. Bigger turkeys are older turkeys, meaning their meat is not as tender and often more gamey. Also, it’s more difficult to properly cook a a very large turkey; if the outside is perfect, the inside may not be quite done.
- Time Matters – The other thing you’re going to need is lots of time, especially if you’re buying a frozen turkey. Even if they tell you that your turkey will be defrosted in a couple of days in the fridge, I would give the turkey a week in the fridge to thaw or about 1 day for every 4 pounds.
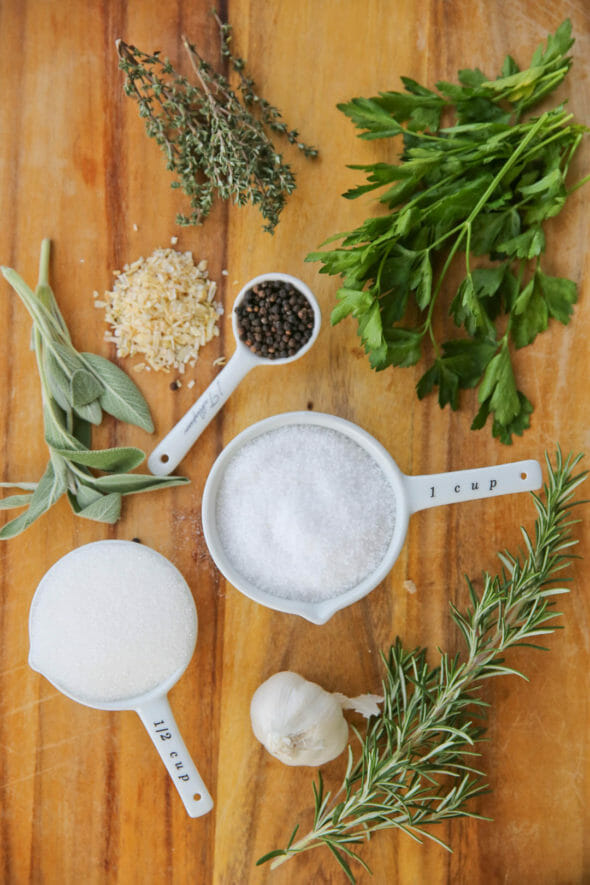
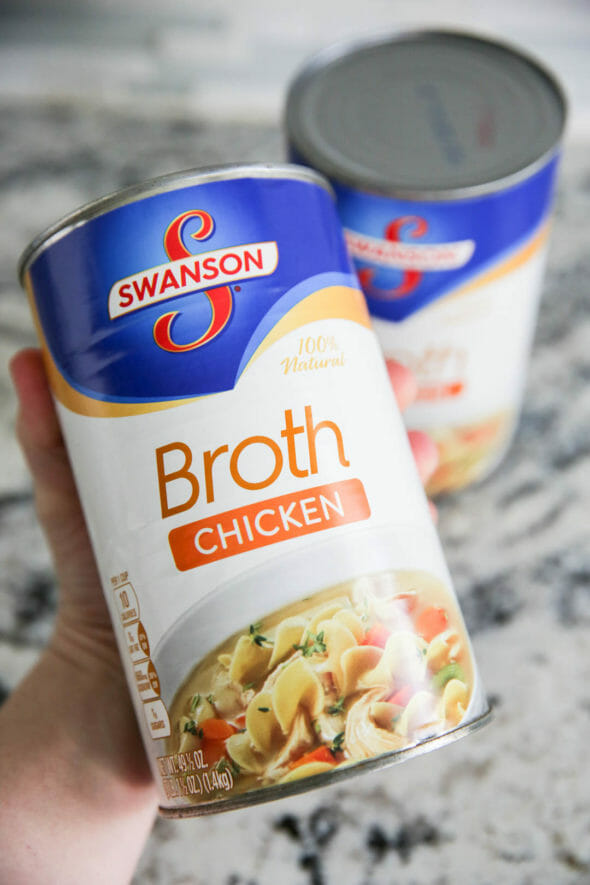
- Chicken broth – 1 gallon of chicken stock. That’s 4 boxes/cartons or 8 normal cans. OR if you can find the jumbo cans pictured below it’s a little less than 3 of those.
- Whole peppercorns
- Brown or white sugar
- Kosher salt
- Fresh garlic
- Dehydrated onion
- Fresh Thyme
- Fresh sage
- Fresh rosemary
- Fresh parsley
- Water
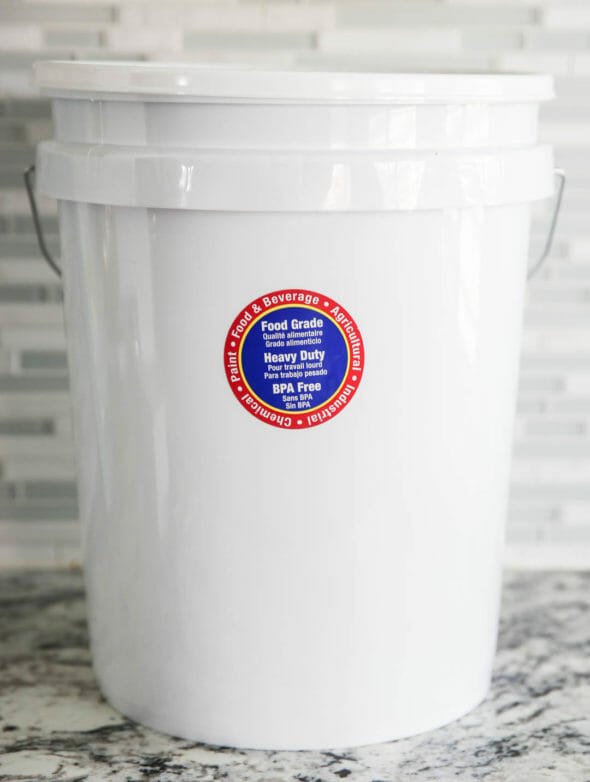
- Ice – You’ll need 8 cups of ice to add to the brine bucket, but if you live in a warm climate and don’t have a cold place to store the bucket during brining, you may need to purchase bagged ice to pack around the bucket in the sink, bathtub, or large cooler.
Herb Butter
- Salted butter
- Fresh sage
For Roasting
- Chicken broth
- Fresh garlic
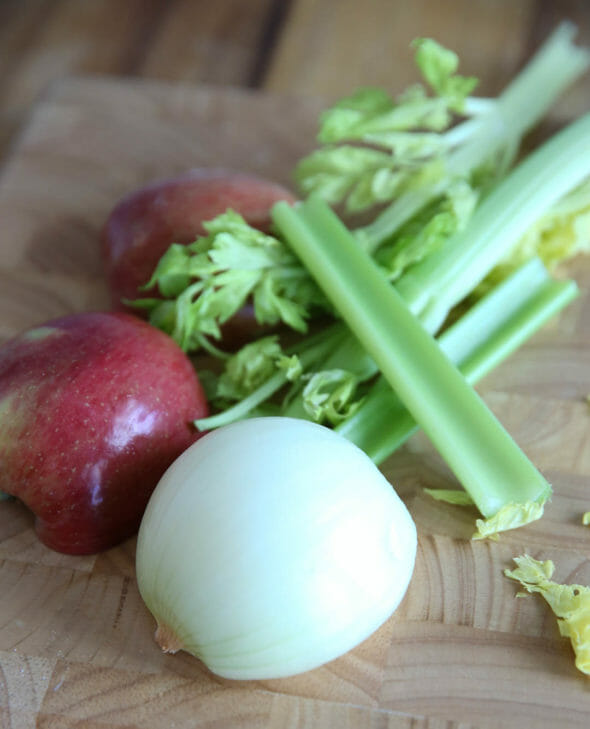
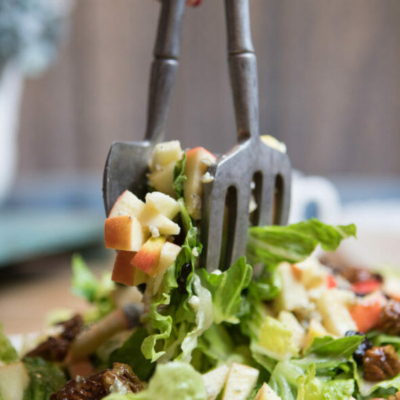
- Apple
- Onions
- Celery
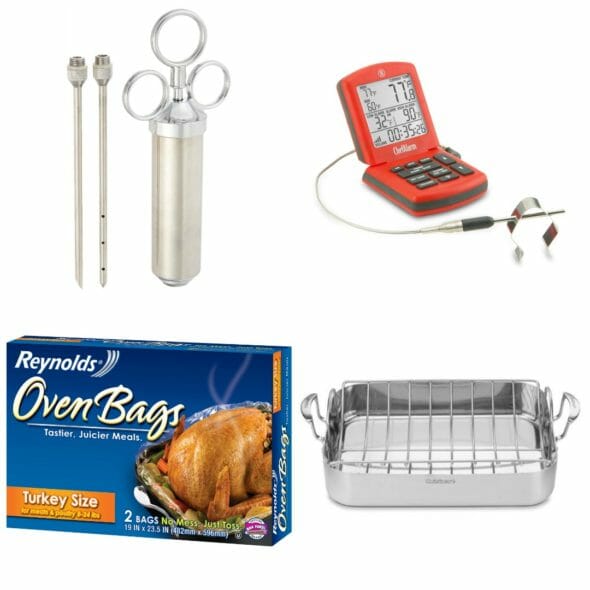
Equipment
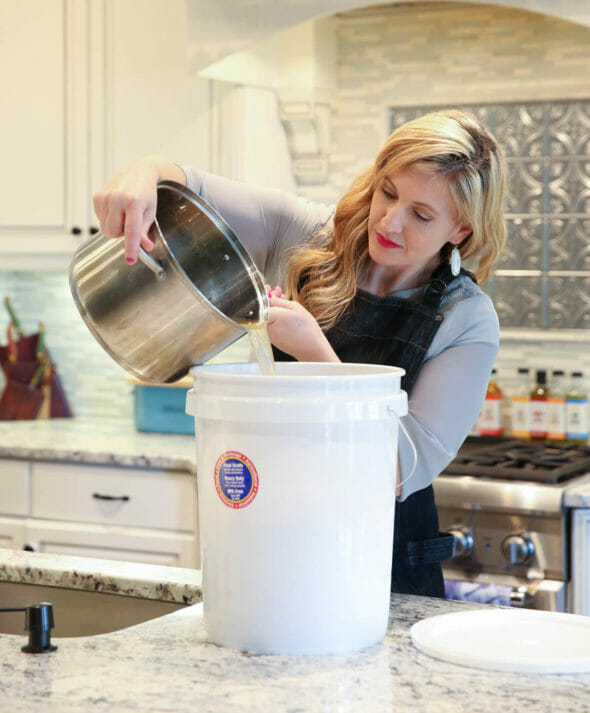
- Bucket – You’ll need a 5-gallon bucket (or something similar). I bought mine at Walmart in the paint department and it’s labeled safe for food. Even if it’s not labeled as such- I don’t stress too much about it. Make sure you get the accompanying lid, which is often sold separately.
- Thermometer– You’ll also need an accurate meat thermometer that can be inserted into the turkey and left there while it’s roasting in the oven. Our very favorite is this Chef Alarm from Thermoworks, but there are lots of affordable options on Amazon as well.
- A Turkey Injector- You can find them in the small cooking tools aisle of a department or grocery store, or I have this Grill Beast one and it is THE best I’ve ever used.
- Pan– A heavy roasting pan.
- Roasting Bags – you can find turkey-size disposable roasting bags in the grocery store, usually near the foil and zip-lock bags.
- Nitrile Gloves – If you’ve been around awhile, you know I always have a box of nitrile gloves in my kitchen. They make working with raw meat much easier. If you are squeamish about handling a large, raw turkey, these are a must!
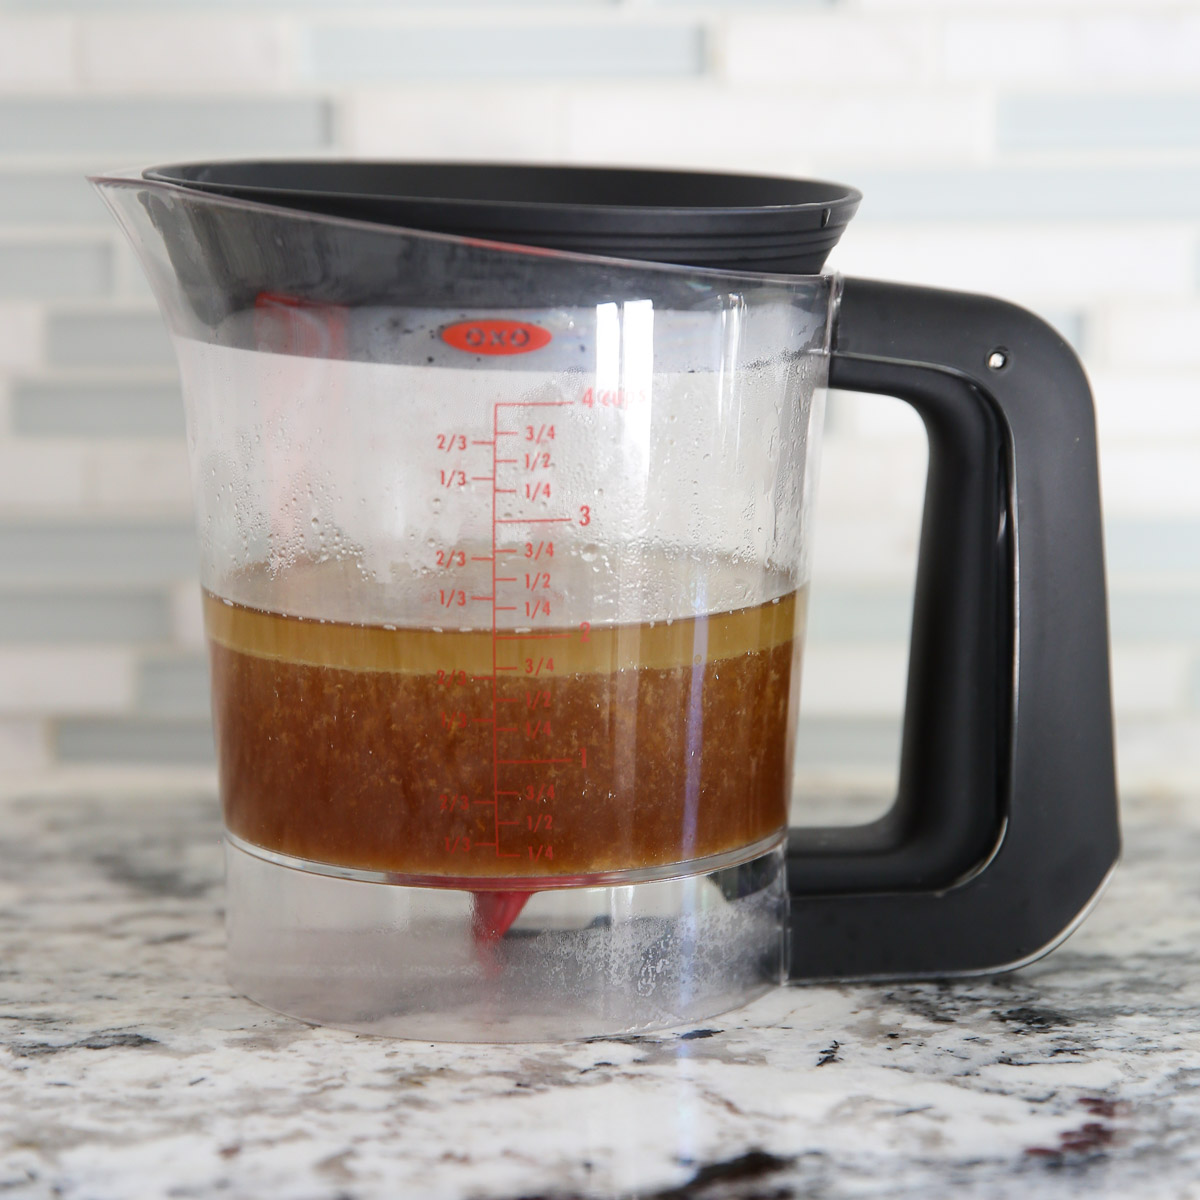
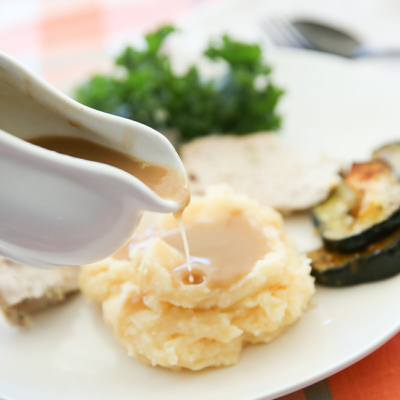
- Fat Separator – While not 100% necessary for cooking the turkey, you will want a fat separator (like this OXO Fat Separator ) to help separate the cooking juices, which makes making the gravy a breeze!
Ready? Scared? Don’t be! The thing I love MOST about this recipe is that it’s nearly fail-proof.
How to Make the Best Thanksgiving Turkey
Step 1: Brine the Turkey
- The day before you roast your Thanksgiving turkey, make sure your turkey is thawed. See the Ingredients and Equipment Needed notes above for more details.
- Open the packaging and remove all the insides. This means you’ll have to check the body cavity and the neck cavity because that is where the pieces are usually hidden. If you’re planning on using the giblets and the neck to make gravy, rinse them off and refrigerate them in a Ziploc bag. Otherwise, discard them. Rinse the turkey inside and out and let it drain.
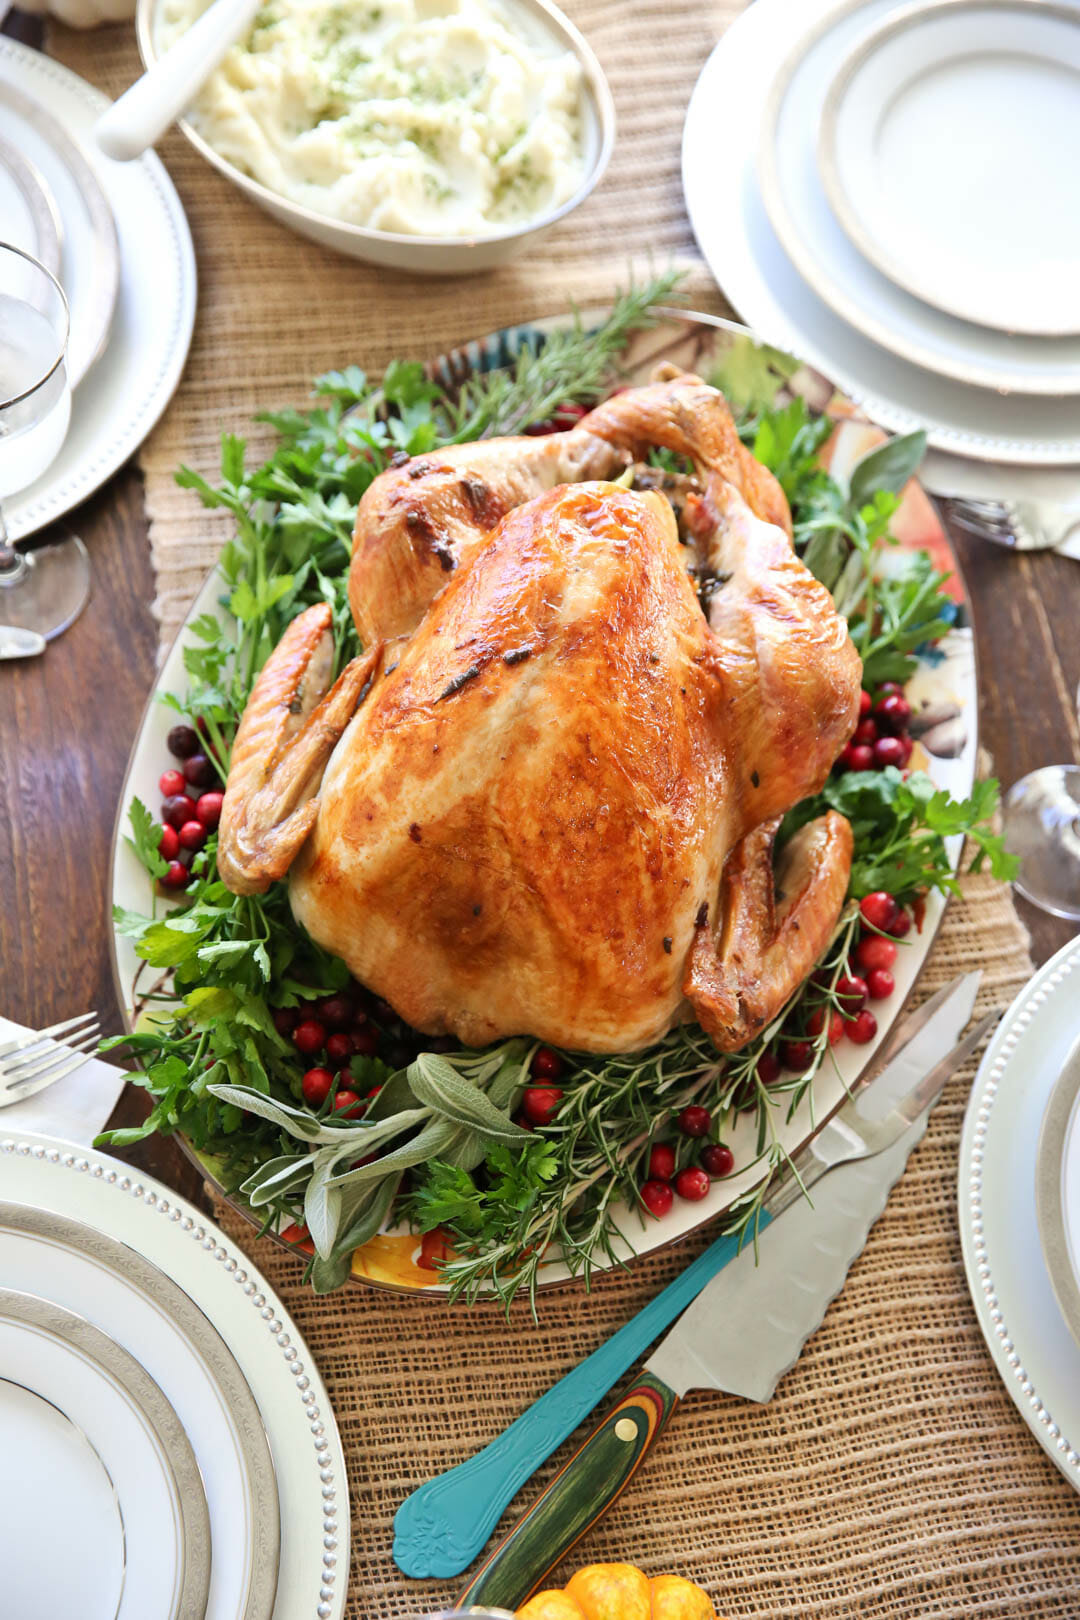
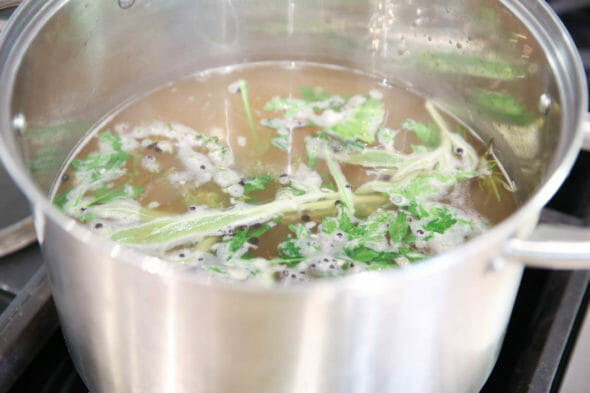
- To a very large stock pot, add 1 gallon of chicken stock. You’ll add a whole cup of kosher salt and an array of spices and herbs, like peppercorns, sugar, dehydrated onions, garlic, parsley, thyme, sage, and rosemary.
- Bring this mixture to a boil and then let it cool to room temperature. When the brine mixture has cooled, place the turkey in the 5-gallon bucket and cover it with 8 cups of cold water and 8 cups of ice. Then pour the cooled brine mixture over it.
- Cover the bucket with a lid and place it in a cold place. If it’s cold outside, you can keep the bucket outside–a tight-fitting lid should keep the yummy smells inside and animals away. If it’s VERY cold outside, you could keep it in a cold garage. If it’s not cold at all and you’re wondering if winter will ever happen, you can keep it in one side of a sink or in a bathtub and then regularly pack it with ice so it stays cold. If you have an ice maker, it probably won’t be sufficient for your icy needs and you’ll probably have to go buy bags of ice from the grocery store. This is a small price to pay for deliciousness. Brine the turkey for 24 hours.
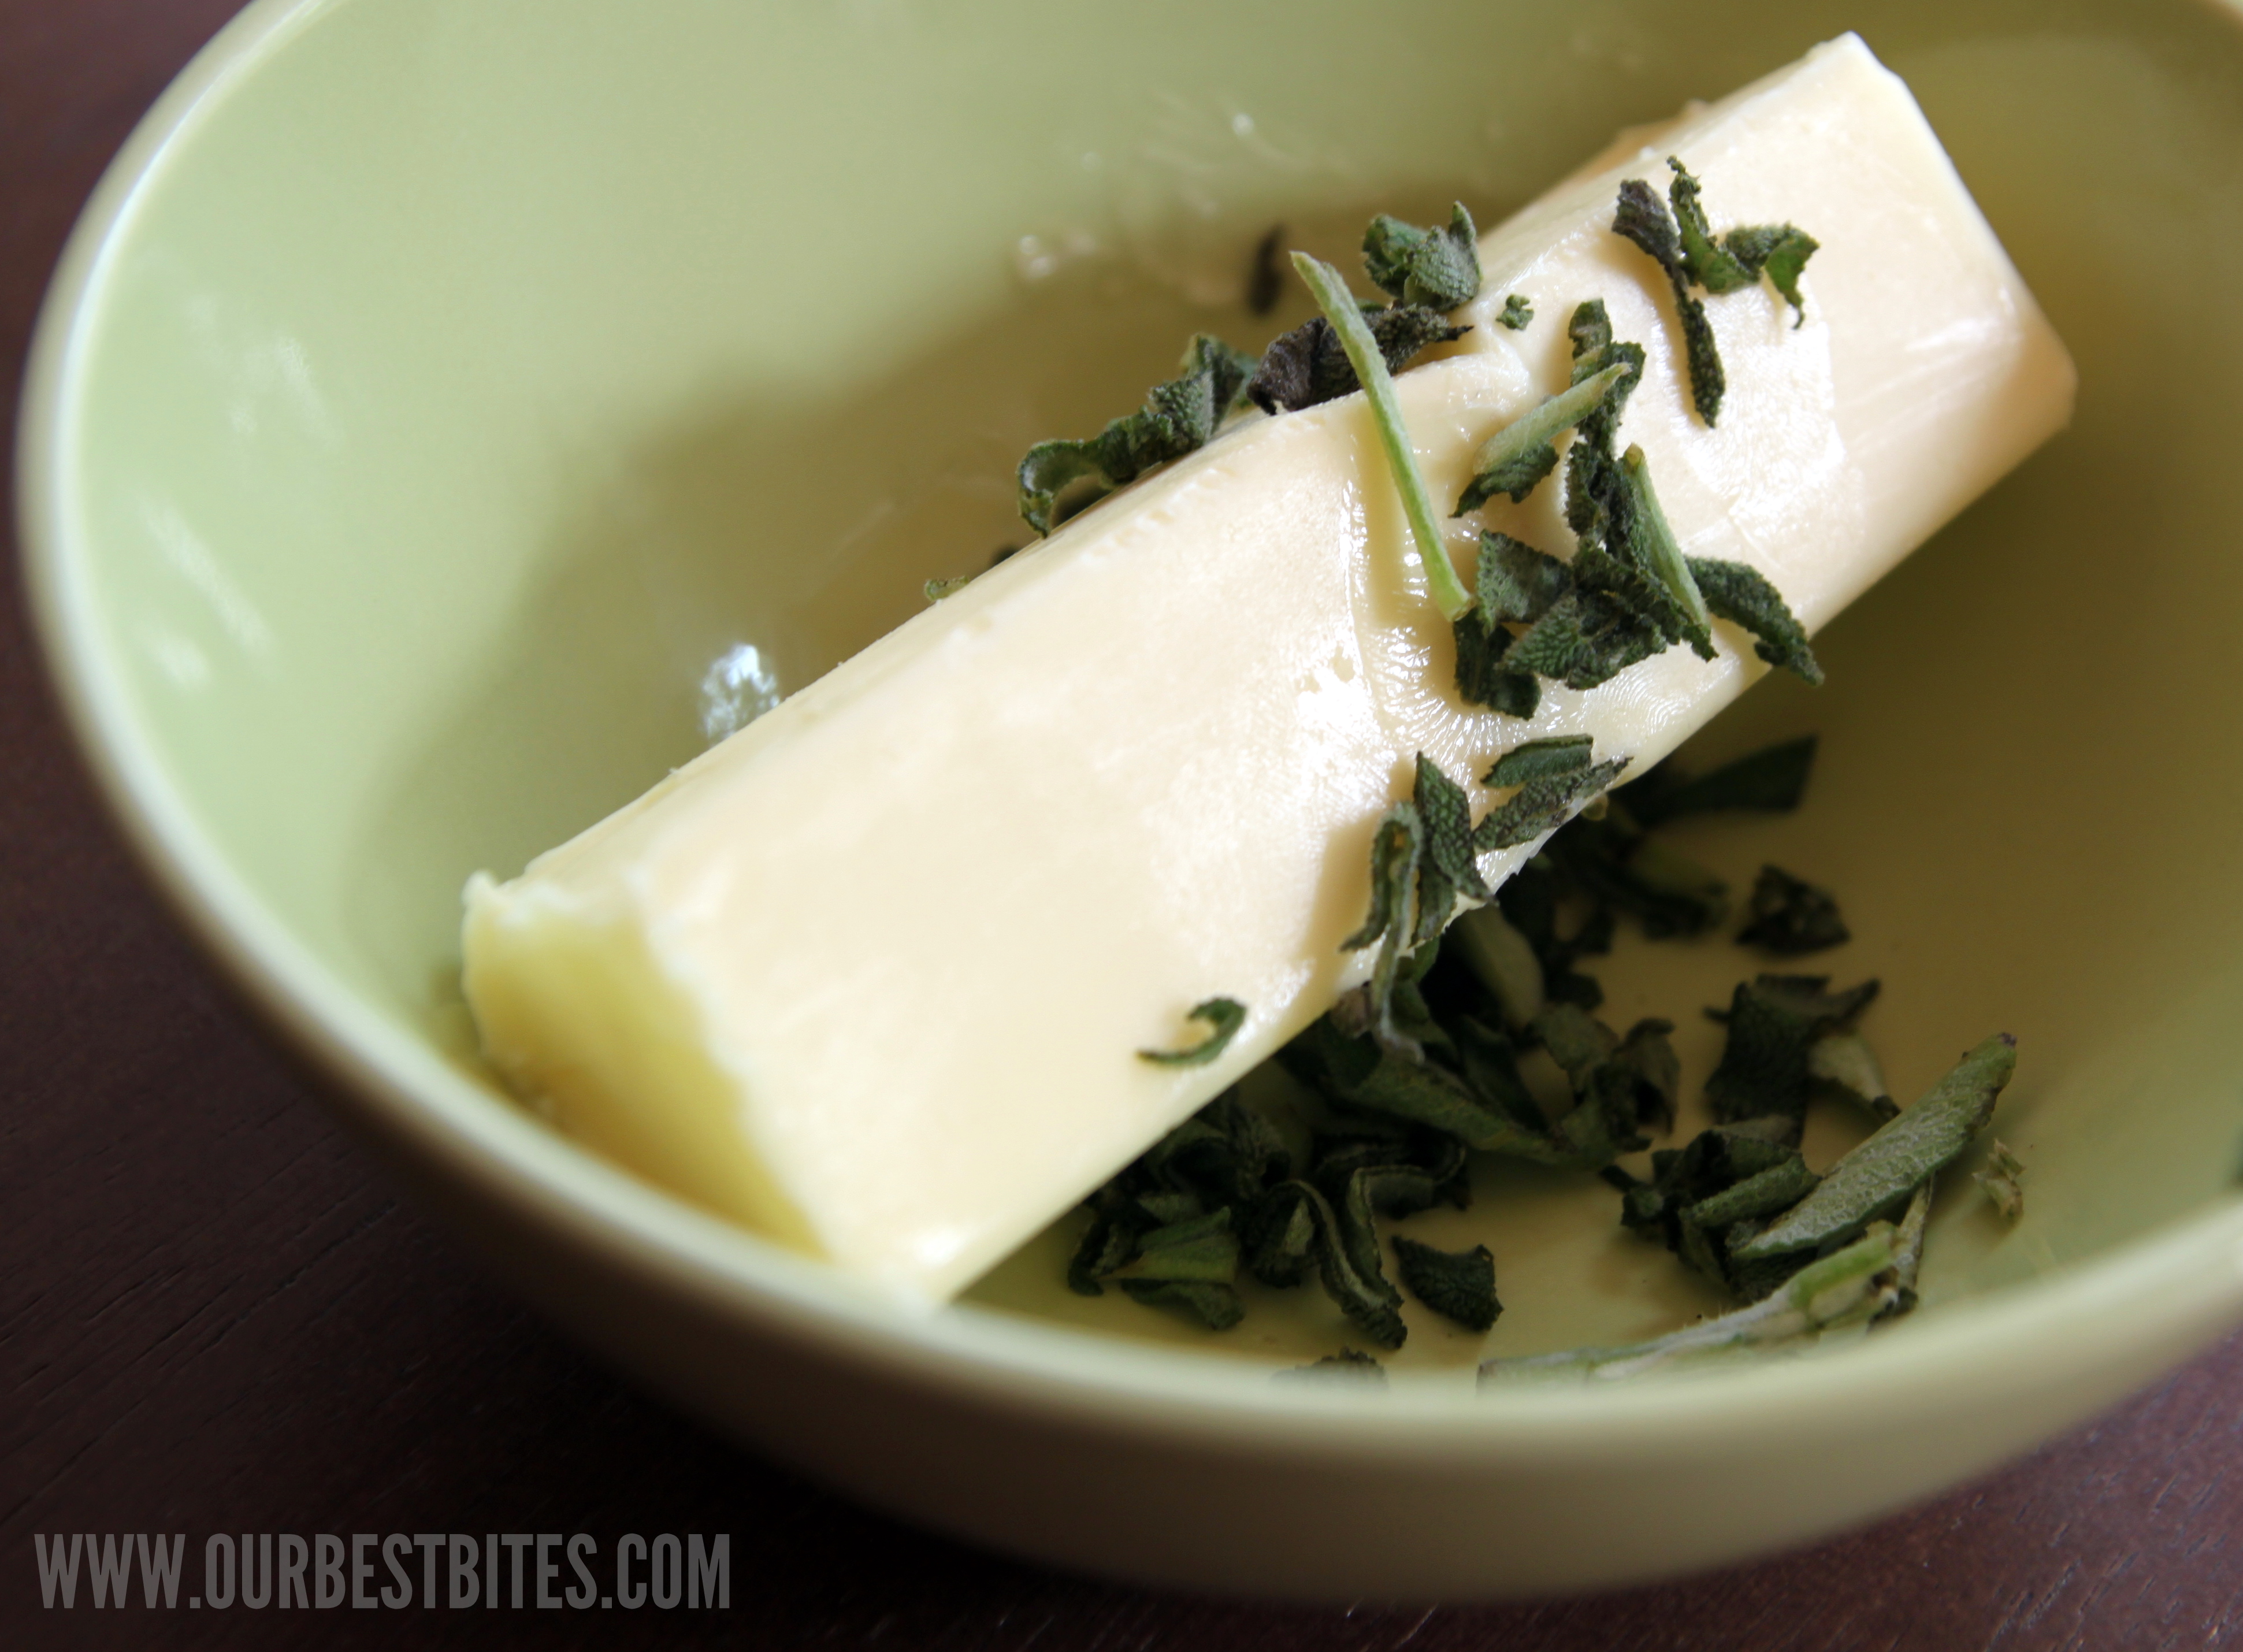
Step 2: Make an Herbed Butter rub
- When you’re ready to roast, preheat your oven. Soften a stick of butter and mix it with a tablespoon of freshly chopped sage. Remove the turkey from the brine and rinse it in cool water. Tuck the wings behind the body of the turkey and then slip your hand between the turkey breast and the body to loosen the sink.
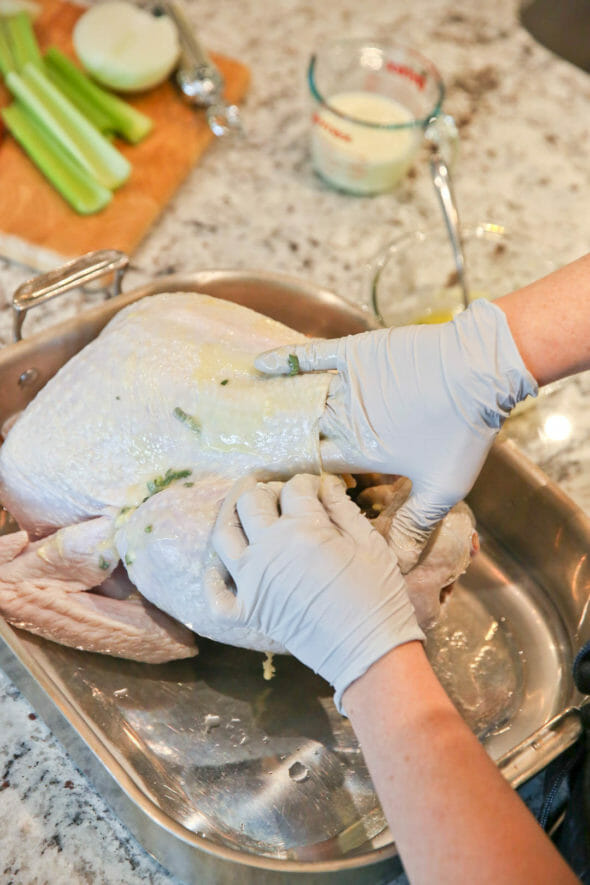
- Grab some of the sage butter with your hand and rub it all between the turkey breast and the skin. It helps to pop your butter in the microwave until it’s part-way melted.
- If you can get your hand between the skin and the dark meat of the turkey, more power to you–the more sage butter under the skin, the better. You will probably not use all the sage butter under the skin. Rub the rest of it on top of the skin and all over the bird.
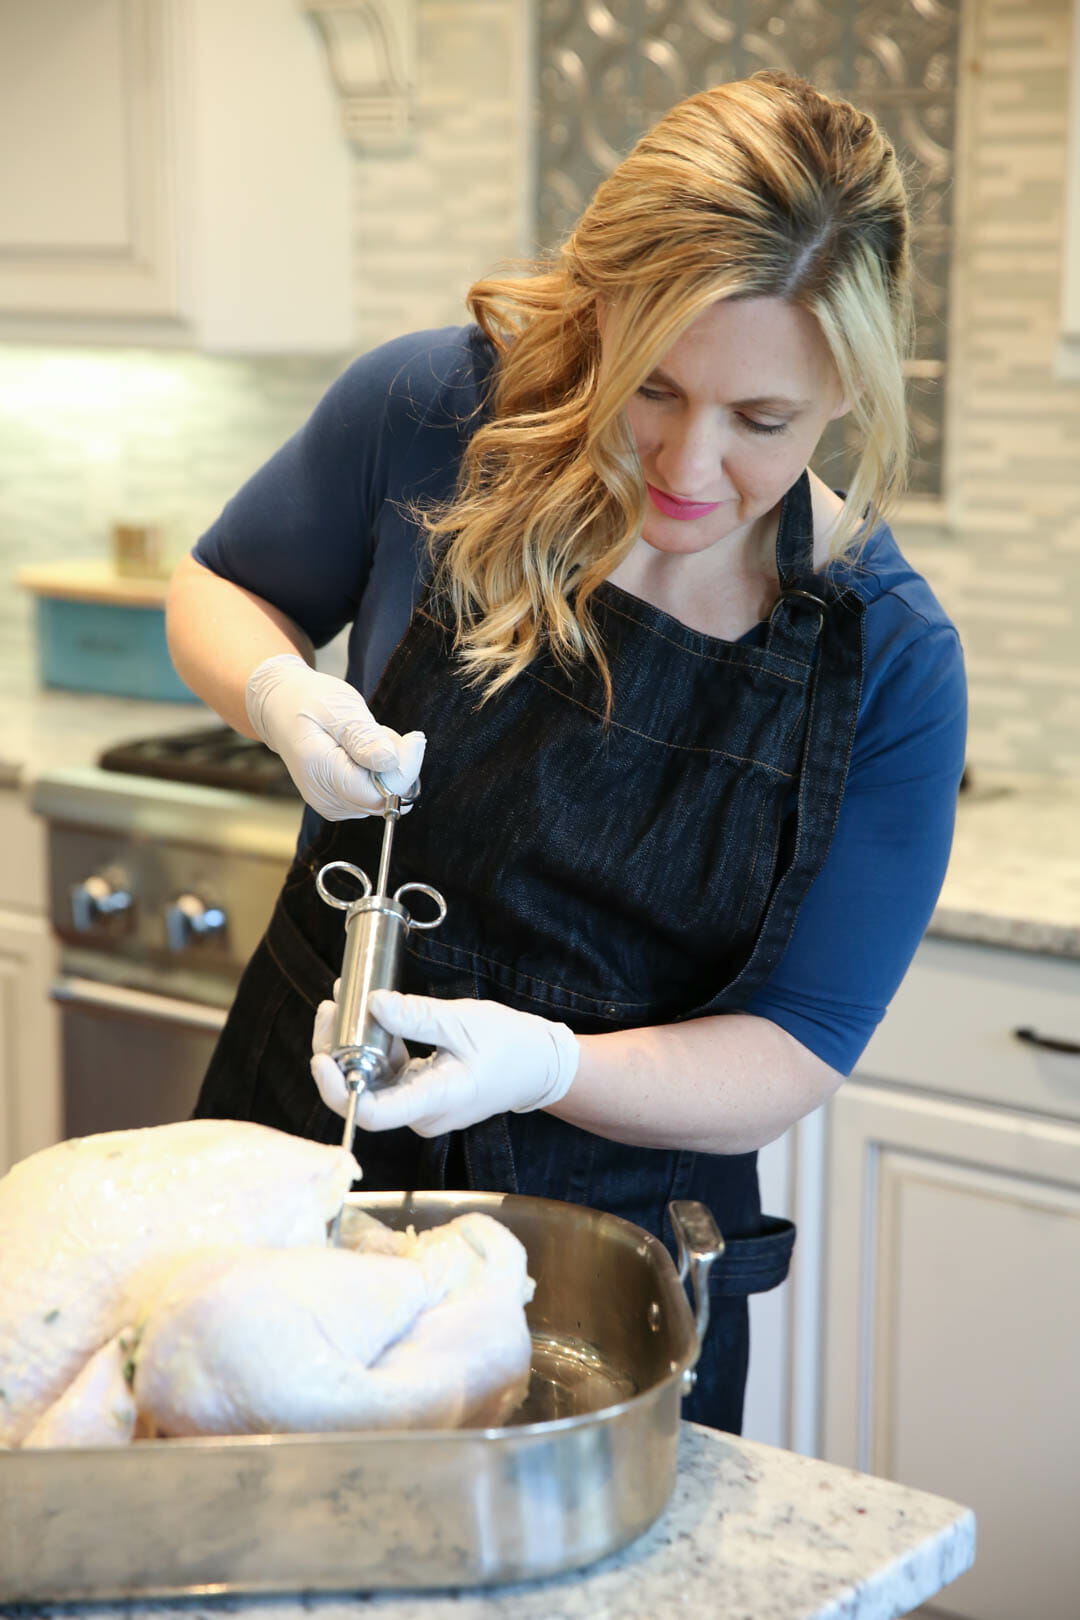
Step 3: Inject the turkey
- In a blender, combine about 2-3 cloves garlic, 1/2 cup chicken broth, and 1/4 cup melted butter until completely smooth. Retrieve your flavor injector.
- This part is kind of fun. Suck up the mixture into the syringe and then insert it all over the turkey–in the breast, in the thighs, everywhere. This particular syringe I have is no joke. Stainless steel and super strong. It also comes with 2 different tips depending on what type of marinades you are using.
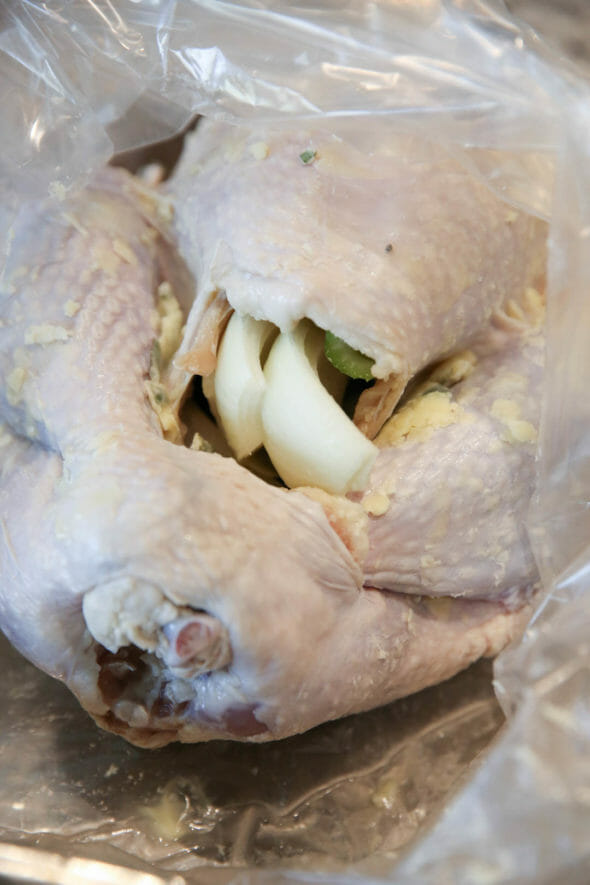
Step 4: Stuff the Turkey with aromatics
- Slip any remaining rosemary and thyme under the skin of the turkey. Now is a great time to transfer the turkey into your roasting bag (according to the directions on the roasting bag, although there’s, like, a 99% chance they’re going to have you shake some flour around in the bag first). Chop a few apples, onions, and some celery and then stuff them into the cavity of the turkey.
- Insert the meat thermometer into the thickest part of the breast and then seal up the roasting bag, making slits in the bag if you’re instructed to do so.
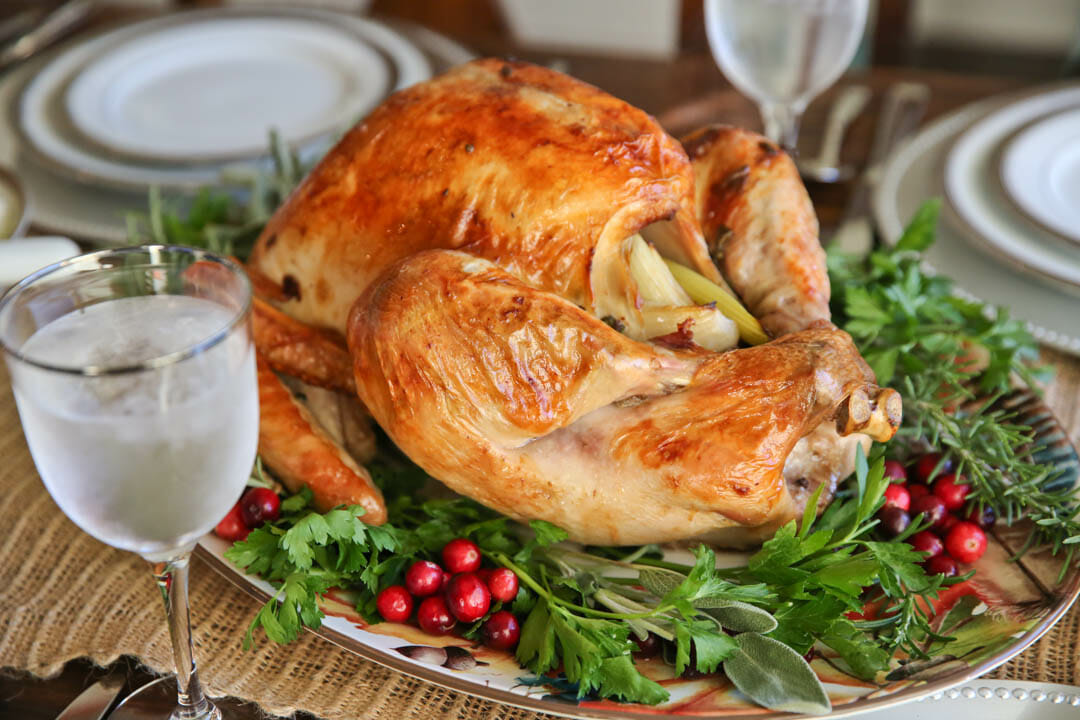
Step 5: Roast the Turkey
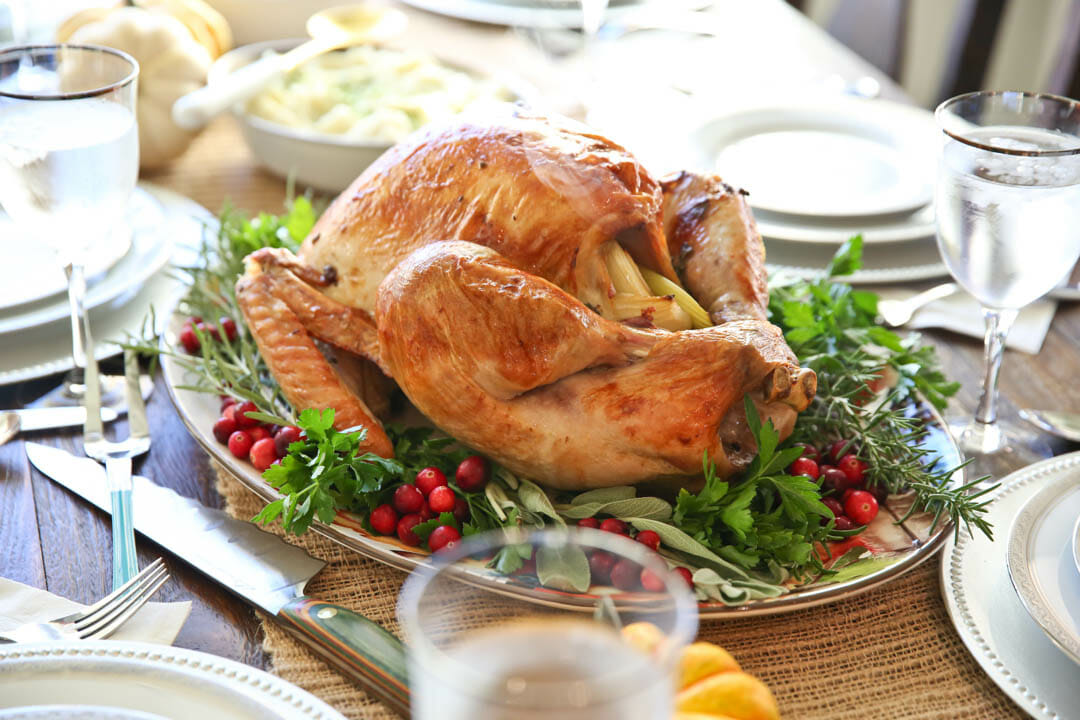
- Roast the turkey according to the directions on the turkey bag until the meat thermometer registers 165°F in the breasts and 180°F in the thighs. My 12 pounder took about 2 hours, maybe a bit more. Remove from oven, cut the bag off the turkey, and then let it stand, tented with foil, for about 15-20 minutes so the juices can redistribute and the turkey will remain moist after slicing. Serve with all your favorite Thanksgiving goodies! This Thanksgiving turkey has become a family tradition in thousands of homes across the country. I’m so glad that so many of you love it as much as I do!

Storing and Other Tips
- Move leftover turkey to an airtight container in the refrigerator within 2 hours of serving. Enjoy your leftovers within 3-4 days for best results.
- If you’d like to freeze your leftovers, divide into manageable portions in freezer safe bags and remove as much air as possible. Turkey can be frozen for 2-3 months but may dry out if frozen longer. For best results, slice or shred the meat before freezing to make thawing and reheating easier.
- For crispy skin: If you want your turkey skin extra browned and crisp, slip the bag off about 30 minutes before the turkey is done (and turn on the convection oven if you have one). That crisps and browns the skin really well while still keeping the meat tender and moist.
Frequently Asked Questions
Yes, you can cut it in half (or more) if needed to suit smaller cuts. I would also cut brining time way down to preserve the texture of the meat- it only needs an hour or two. If you’re just cooking the breast, this Roasted Turkey Breast recipe was written for exactly that.
You will have to check your manufacturer’s recommendations on this one. Some say it’s ok to use a roasting bag, but only if the bag doesn’t touch certain parts of the roaster. If I was using a roaster I would probably just forego the bag, as the roaster already serves a similar purpose to hold in moisture.
Yes. The ice is part of the water to salt ratio.
Fresh herbs are definitely best, but dried will work in a pinch.
You certainly can. Lots of animal fats are widely available these days and would make a great substitute. If you can find goose or duck fat (check Walmart!) those would work well. Refined coconut oil (does not have a coconut flavor) might be a good choice as well. Just remember to add a little salt!
It won’t make things overly salted, but they will be well-seasoned. Make sure you taste your drippings before adding them to gravy. If you find that your resulting gravy is too salty, simply add a good splash of cream or spoonful of sour cream to mellow it out.
The Best Thanksgiving Turkey
Equipment
- 5 gallon bucket
Ingredients
Turkey & Brine
- 1 turkey no larger than 12-14 pounds
- 1 gallon chicken broth
- 1 tablespoon whole peppercorns
- ½ cup brown or white sugar
- 1 cup kosher salt
- 5-6 cloves garlic smashed
- 1 tablespoon dehydrated onion
- 1 thyme, fresh large sprig
- 1 sage, fresh large sprig
- 1 rosemary, fresh large sprig
- 1 handful parsley, fresh
- 8 cups cold water
- 8 cups ice
Herb Butter
- ¾ cup salted butter divided
- 1 tablespoon sage, fresh chopped
Roasting
- ½ cup chicken broth
- 2-3 cloves garlic
- 1 apple chopped in half
- 1-2 small onions chopped in half
- 4 stalks celery cut into thirds
Instructions
Defrost
- About a week before you begin brining your turkey, place it in the refrigerator to defrost.
Brine
- The day before you roast your turkey, combine the chicken broth and the remaining brine ingredients (through the parsley) in a very large stockpot. Bring to a boil and then remove from heat and allow to cool to room temperature.
- Remove the packaging from the turkey. Remove the neck and giblets (be sure to check both the body and neck cavities) and reserve for later use if desired. Rinse the turkey in cool water and then place it in the 5-gallon bucket. Add the cold water and the ice cubes, then add the brine mixture. Stir to combine. Cover with the lid and then place in a cold place for up to 24 hours.
Prepare Herb Butter
- When you're ready to roast your turkey, preheat the oven according to the directions on the roasting bag packaging (usually 350℉). Soften ½ cup butter and mix it with 1 tablespoon fresh sage, set aside.
- Remove the turkey from the brine, rinse it in cool water, and place in the roasting pan. Use your hands to loosen the skin over the breast. Spread handfuls of the sage butter between the breast and the skin, rubbing any excess over the outside of the skin.
Inject
- In a blender, combine ½ cup chicken broth, 2-3 cloves garlic, and ¼ cup melted butter until completely smooth. Use the flavor injector to inject the mixture all over the turkey. Slip any remaining rosemary and thyme sprigs under the skin.
Stuff with Aromatics and Roast
- Stuff the apple, onion, and celery into the cavity of the turkey. Insert the meat thermometer into the thickest part of the turkey breast and then place the turkey into the roasting bag and roast until the thermometer registers 165℉ according to the roasting bag directions.
Slice
- When you've reached 165℉, remove the turkey from the oven and cut the bag away from the turkey. Allow it to stand for 15-20 minutes before slicing to allow the juices to redistribute and keep the turkey juicy.
Notes
- Move leftover turkey to an airtight container in the refrigerator within 2 hours of serving. Enjoy your leftovers within 3-4 days for best results.
- If you’d like to freeze your leftovers, divide into manageable portions in freezer safe bags and remove as much air as possible. Turkey can be frozen for 2-3 months but may dry out if frozen longer. For best results, slice or shred the meat before freezing to make thawing and reheating easier.
- For crispy skin: If you want your turkey skin extra browned and crisp, slip the bag off about 30 minutes before the turkey is done (and turn on the convection oven if you have one). That crisps and browns the skin really well while still keeping the meat tender and moist.
Nutrition


Questions & Reviews
That looks like the most amazing turkey! I have a question, though… we have always deep fried our turkey (sounds like a heart attack waiting to happen, I know, but it is so good! And fast, which is even better.). I want to brine our turkey this year too, so do I need to adapt your brine recipe at all if I am going to fry rather than bake? Thanks, and keep up the good work – you ladies are amazing!
Yes, Jenny, you can (and should) brine before you fry. Check my comment #51. Just note that you don’t want any fruit juices in the brine because the sugar caramelizes when you fry it, making the turkey very dark. Kate’s recipe will work fine if you leave out the brown sugar.
I would love to win on the calendars! Never won anything but that would be one thing I would love and would use.
Thanks for giving me a chance.
Lana
Do you think I could get away with using a chicken boullion base for the broth? I have 2- 20+ pounders that I need to brine and that would be around 4+ gallons of chicken broth. The boullion base would be slightly cheaper which catches my eye…
Thanks in advance!
When are you guys going to come up with an iphone app?? Your website is not the easiest to maneuver on a phone. I would totally use the app often.
Several years ago, I wrote up a step-by-step Turkey 101 for my kids. As I told them, it’s not so much a recipe as it is a technique. I’ve only recently started blogging and have just posted my “how to”, but I don’t have the wonderful photos you do in your great post (maybe next year!). Also, after reviewing your post, I realize that I need a flavor injector! I did include my fabulously delicious stuffing recipe along with the turkey instructions. Enjoy…and happy Thanksgiving!
http://www.fransfavs.com/2011/11/roast-turkey-with-stuffing-and-gravy/
Sorry if you’ve already answered this…just wondering about brining a previously frozen turkey. I had heard (well, read…on Pioneer Woman) that you should only brine a turkey that has never been frozen or else it will be too salty. Thoughts?? Thanks! Oh and I absolutely LOVE this website and your cookbook. I’ve made at least a dozen of your recipes and have loved all of them!!
Check out the discussion on comment 13 and see if that answers your questions–if not, let me know! 🙂
Kate, I hate to keep coming back to the stuffing but we LOVE the stuffing inside the turkey. Do you think it is OK to remove it when the turkey is done and resting and put that stuffing back into the oven for 20-30 minutes? Would that make it safe to eat? Thanks for all of the recipes – I love this blog!
Yep, you could definitely do that. Or you could even (gasp!!) microwave it. 🙂
The roaster bags have always been my secret trick. It makes the turkey a success EVERY. TIME.
Please tell me this Thanksgiving week, you will teach us how to make gravy!
Oh, Nicholle, I kind of feel like gravy is even MORE personal the stuffing or turkey, so I’m scared to tell people what to do, haha!
You’ve got a few options. With this particular turkey, this is what I’d do:
1. Rinse the giblets (neck and internal organs that are in the turkey) in cool water and place in a saucepan with a sprig each of rosemary, thyme, and sage, 2-3 cloves of smashed garlic, and half an onion. Cover with water. Bring to a boil, cover, and then simmer it for about an hour.
2. When you’re ready to make the gravy, strain the solids from the liquid and discard them. Take a gravy packet (I just use McCormick turkey gravy) and follow the instructions for gravy, but instead of water, use the liquid from the giblets. Season with salt and black pepper to taste.
3. Congratulations! You’ve got gravy. 🙂
Normally, you can just use the drippings from the turkey, but the drippings from this turkey are SO salty that when you combine them with a gravy packet, it’s a super, super salty gravy.
Does that help?
First of all, this was my very first turkey ever, and I followed your directions word for word (except I forgot to use a bag), and it was AMAZING! Best turkey ever – so said my husband, and so say I! I can’t imagine wanting to change a thing!!! It was so moist and flavorful.
But second, in response to the above discussion, I used the drippings for gravy from the brined turkey and it wasn’t salty at all. In fact, I ended up adding a bit of salt at the end. I didn’t use a gravy packet – I just followed a recipe I found online. Boiled the giblets with a bit of chicken stock with some onion and fresh rosemary, thyme and sage for about 2 hours, skimmed the fat off of the turkey drippings, made a roux with some of the fat and then combined the strained stock with the drippings to make a really yummy gravy. Anyway, just wanted to say: it wasn’t too salty at all, so maybe give it a try!
Becca, would you mind posting a link to gravy recipe you used? Thanks!
Ha ha, I just discovered comment 25. I know it’s probably dumb to ask if below freezing is too cold to have it out but I just want to make sure.