 When I was in Kindergarten, I remember our Halloween party so clearly. One of the room moms brought apple juice and dry ice for a witch’s brew and it has stayed with me to this day (I say that like I’m not 30…and if you think 30 is old, then I am sad and hope no one calls you old when you’re 30. Or maybe I do…) Even though it was just apple juice and a black plastic cauldron, we were all blown away.
Fast forward 17 years to my senior year of college when I was doing a presentation on Frankenstein and I brought the same magic potion to a room full of college kids. And they had the exact same reaction as we did when we were in Kindergarten. After that, it kind of became my “thing”; I am voluntold every year that I will be bringing the drink to the classroom Halloween parties and that it will be Witch’s Brew and that everyone is very excited. And by “everyone,” I mean the teachers.
This year, I decided the witch’s brew is fun and cute, but we should up the ante. Mad scientist style. Now…I’m going to show you guys some tricky techniques here and I need you to stay with me and not be scared or intimidated about what we’re going to do. Note: the sarcasm button is broken on my keyboard right now, so this is my way of telling you that there is nothing tricky and going on here. I also really want you to not send me hate mail and leave mean comments that I’m pretty much giving you a step-by-step photo tutorial on how to make Kool Aid. We are in the throes of full-fledged holiday/sick kid/book-writing/dog-ate-husband’s-dinner-then-got-sick chaos/laundry-is-reproducing-in-the-living-room-at-an-alarming-rate crisis at our house right now and I imagine I’m not the only one, so this is a super-easy way to knock the socks off your kids (and make their friends think your kid has the coolest mom ever).
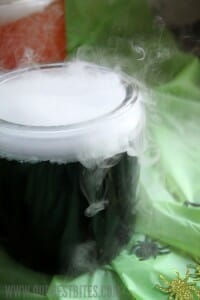
You’ll need some glass jars (I got these apothecary jars at Walmart for under $10 apiece–2 1-gallon jars and 1 2-gallon jar, but you can always grab some on Amazon), drinks of your choice (I used Kool-Aid because it’s cheap and the kids who will be drinking it care WAY more about the “potion” than the fact that it is not even remotely gourmet, but you could use Sprite flavored with Jello, Hawaiian Punch, or anything else you can think of, even if it involves food coloring), and dry ice.  There are lots of misconceptions about dry ice, but these are my experiences:
-Dry ice is not outrageously expensive. It’s about $1 a pound and you’ll need about 1 pound per gallon of potion.
-It’s not sold everywhere, but it’s not terribly hard to find, either. I used this Dry Ice Directory to find a place close to me that sold it. I live in a fairly small town in the middle of Louisiana and I found two grocery stores within 10 minutes of my house that sold it.
-It doesn’t keep for very long. Storing it in your freezer for a few days is not the best idea–you’re likely to open up the bag and find nothing there. I try to buy it at the very last minute and then keep it wrapped up in towels, paper bags, and an insulated cooler until I’m ready to use it.
–It will hurt you if you’re not careful. You need heavy-duty gloves or even an oven mitt and some tongs. Don’t let your kids play with the brew unsupervised (although it’s pretty funny to watch your dog bark at and then hide from the dry ice clouds).
Place the Kool-Aid and sugar (or whatever drink you’re using) in the jars.
 Fill the jars with water and mix well. See, I told you this was tricky.

Carefully (if I were REALLY smart and safe, I’d wear goggles, but my version of living dangerously involves breaking dry ice with a meat mallet and no safety goggles) break the ice into chunks that are roughly 4-6 inches long/wide somewhere. Basically, just try to not get them too small or leave them too big. Place one piece at a time into each jar, saving the rest to refresh the bubbling potion effect later. The ice will sink to the bottom of the container and you will be ladleing into cups from the top of the container. Another option, to be safe and not accidentally ladle dry ice into individual cups, is to place the juice containers inside of a larger glass container that contains just the dry ice and some water. That way it bubbles all around the beverage you’re drinking, but not in it. If you have other people serving themselves, I would suggest using this method, and not putting the dry ice directly into the liquid to avoid accidental swallowing.
I’m serious, kids and adults alike will freak out. It’s pretty fun.
Serve immediately.

If you’re patient, you can even offer to play the mad scientist and mix flavors together for the adventurous kidlets. Not super appetizing, but they’re kids and you’re (probably) mixing fruity flavors and not Sprite, Coke, Root Beer, and Mountain Dew or some other ghastly double-dog-dare combination.

Mad Scientist Potion
Ingredients
- Large glass jars or beverage containers
- Brightly colored drink of your choice
- Dry Ice 1 pound per gallon of potion
- Heavy-duty gloves and/or an oven mitt and tongs
Instructions
- Prepare drinks if necessary in the beverage jars. Otherwise, pour the drinks into the jars.
- Carefully break up the dry ice with a mallet or a hammer. Add one piece (about 4-6 inches somewhere on the piece) per gallon at a time to the drink containers and replenish the dry ice as necessary. Serve immediately, ladling the juice into cups and leaving the dry ice in the large containers. If you want to be extra safe (recommended), just place the containers of juice inside another container where the dry ice is, so you don't run the risk of ladling any dry ice into a cup.
Notes
- Note: The 1 pound per gallon rule will give you about an hour's worth of potion. If you need 2 hours, you'll need 2 pounds per gallon, and on and on.


Questions & Reviews
Who knew it was so easy? Thanks –
Thanks for the reminder about such a fun, “magical” drink/activity!
How cute is this! My baby girl is only 14 months old so she wouldn’t appreciate it but maybe next year she will!!
This idea is so awesome! I’m glad I ran across it, my son’s birthday party is this weekend and I’m super stoked for him to see this! (He just turned 3!) So him and his little buddies will love it! Thanks! 🙂
That is awesome…my kids are too little to appreciate that YET…but you can bet I will be making it when they are old enough…so much fun and so simple!!!
How long does dry ice last outside of the freezer? If I have a party Sunday afternoon and I buy the dry ice Saturday night, where would I store it? Sorry maybe this is a dumb question . . .
Dry ice usually comes in a plastic bag. Leave it in the bag and wrap in several thicknesses of newspaper and in an ice chest and it should last for a long long time. It will melt a bit but should be ok. If it during the day and hot out, keep the chest in a shaded area. or inside the house.
Also, you might want to purchase 1 pound more than you need. This way you will still have plenty to use throughout your party or gathering.
Great. I’m the kindergarten room mom and I just got back from the store where I bought chocolate milk and thought I was cool. I guess I will be going back from some dry ice and koolaid.
We carried on my husband’s family tradition of making homemade root beer at school every year for years and years, so they, too, expected it.=) Usually on Halloween – the kids loved it!! Very easy to make: 5 lbs. dry ice, 5 gallons water, 5 lbs. sugar, and 1 bottle of root beer extract. This needs to be made in a 10 gallon container otherwise it will overflow all over. Ready to drink in 30 minutes! Yummy!
I love this idea, but sadly there is no dry ice within less an hours drive.
Way way fun idea….i have always used dry ice at Halloween to make smoke bubbles. I get a cauldron add water, and several drops of dish soap, stir, and add dry ice. when it starts to react you get smoke bubbles, and if you catch them and clap your hand they pop and smoke come out. Kids, adults, everyone loves it. So will now have to add a fun drink to the list!!!