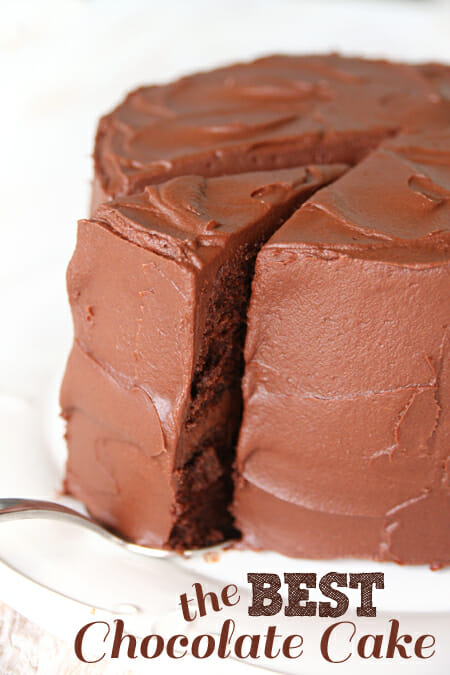
 I don’t need to do a lot of explaining today since I sang my chocolate cake praises in my last post. If you missed it, this is the cake recipe that goes with this chocolate frosting that I could eat plain from a bowl. The cake was on the cover of the “All-Time Best Recipes” Collector’s Edition from Cook’s Illustrated. My one piece of advice is that you take the time to follow all of the steps as written. What I’ve found with Cook’s Illustrated is that every minute step and process has a very specific purpose. These people try a recipe 428 different ways in order to get the best result- so I try not to stray too much- especially when it comes to baking! This is just a great, basic, perfectly chocolaty, moist, delicious old-fashioned cake. I say we just get right to it, don’t you? Oh, one tip first: When I’m embarking on a big project like this (not that a cake is a huge project, but it does take time. And lots of dishes.) I often make the cakes one day in advance. When completely cooled, wrap well with plastic wrap and then place in an airtight container. Either store overnight, or pop in the freezer for a few days (or weeks). Totally cuts down on time and dishes the day you will be making and eating your delicious cake!
Alrighty then. Unsweetened chocolate. If you are like me, this will instantly take you back to your childhood when you sneaked into the pantry and assumed it was semi-sweet. Mean Mom, very mean.

Use a small glass or metal bowl to create a double boiler. This pudding-like mixture is one of the tricks to the great texture of the cake. We’ve got the melted chocolate in there, as well as some cocoa powder and hot water.

It will start to thicken, and if you let it- it becomes quite thick.
But then you add some sugar

And it magically becomes soft and smooth and glossy.
I love magic of the chocolate variety.

Set that aside to cool and you’ll whisk up some eggs until they’re nice and frothy. The recipe calls for a stand mixer,
but you can certainly make this with a hand mixer as well.

In goes more sugar, because, well, we’re making a cake here people.

And then that chocolate pudding-ish stuff

And then some very soft butter. Seriously, soft. Not melted, just super duper soft. Apparently I have no pictures of super soft butter, but trust me. It’s in there.
Mix up those dry ingredients

and alternate them with the buttermilk + vanilla. Yes, it’s important to alternate! I have a hunch there’s people who ignore that step in baking, and it definitely affects the outcome.
If you dump everything in at once, you’re just making a big chocolate muffin 🙂
 In the batter goes to the pan and then onto the oven. Here’s a trick: When you are inverting a warm cake to a cooling rack, place a paper towel down first. It will still let the air circulate, but it prevents the cake from sticking to the rack.

Once those babies are cooled you can frost. Place your first layer on your serving platter or cake plate and slather some frosting on top.

Place the other layer on top and try to pretend it’s not just a huge whoopie pie wanting to be eaten right then and there.

From there, I don’t try to be pretty, I just start slathering. Place a large amount on top so that you always have something to spread around.
This way you don’t really need a crumb layer.

Try to get everything evenly coated- seriously, doesn’t have to be pretty yet! It’s more important that the frosting is evenly distributed. See? Messy cake.

Once you are to that point, you can use an off-set spatula to gently smooth out the sides. It helps to run the spatula under very hot water first and dry it off before spreading.

For the top, I just use a spatula, or even a spoon, and make sort of a figure eight pattern to swirl it around. We’re going for sort of a casual elegance here. Shabby-Chic. Casual Friday, but with heels. Catch my drift?

Then you can cut into that sucker…

And I will not judge you for making moaning sounds when taking your first bite.
And possibly every bite thereafter.

Old-Fashioned Chocolate Layer Cake
Cooks Illustrated All-Time Best Recipes, David Pazmino
Note: Don’t make the frosting until the cakes are cooled, and use the frosting as soon as it is ready. If the frosting gets too stiff to spread easily, wrap the mixer bowl with a towel soaked in hot water adn mix on low speed until the frosting is creamy and smooth. Refrigerated leftover cake should sit at room temperature before serving until the frosting softens.
12 Tablespoons (1 1/2 sticks) unsalted butter, very soft, plus extra for greasing pans
1 3/4 cups all-purpose flour, plus extra for dusting pans
4 oz unsweetened chocolate, coarsley chopped
1/4 cup dutch-processed cocoa powder
1/2 cup hot water
1 3/4 C sugar
1 1/2 teaspoons baking soda
1 teaspoon table salt
1 cup buttermilk
2 teaspoons vanilla extract
4 large eggs, plus 2 large egg yolks
Adjust oven rack to middle position; heat to 350 degrees. Grease two 9-inch round by 2 inch high cake pans with butter; dust pans with flour and knock out excess. Combine chocolate, cocoa powder, and hot water in medium heatproof bowl; set bowl over saucepan containing 1 inch of simmering water and stir with rubber spatula until chocolate ins melted, about 2 minutes. Add 1/2 cup sugar to chocolate and stir until glossy, 1-2 minutes. Remove bowl from heat and set aside to cool.
Whisk flour, baking soda, and salt in medium bowl. Combine buttermilk and vanilla in small bowl. In bowl of stand mixer fitted with whisk attachment, whisk eggs and yolks on medium-low speed until combined, about 10 seconds. Add remaining 1 1/4 C sugar, increase speed to high, and whis until fluffy and lightened in color, 2-3 minutes. Replace whisk with paddle attachment. Add cooled chocolate mixture to egg/sugar mixture and mix on medium speed until thoroughly incorporated, 30-45 seconds, pausing to scrape down sides of bowl with rubber spatula as needed. Add softened butter 1 tablespoon at a time, mixing about 10 seconds after each addition. Add about 1/3 of flour mixture; followed by half of buttermilk mixture mixing until incorporated after each addition (about 15 seconds.) Repeat using half of remaining flour mixture and all of remaining buttermilk mixture (batter may appear separated.) Scrape down sides of bowl and add remaining flour mixture; mix at medium low speed until batter is thoroughly combined, about 15 seconds. Remove bowl from mixer and fold batter once or twice with rubber spatula to incorporate any remaining flour. Divide batter evenly between prepared cake pans; smooth batter to edges of pan with spatula.
Bake cakes until toothpick inserted into center comes out with a few crumbs attached, 25-30minutes. Cool cakes in pans 15 minutes, then invert onto wire rack. Cool cakes to room temperature before frosting, 45-60 minutes.
Frost with: Old-Fashioned Chocolate Frosting


Questions & Reviews
The answer to my own question is 24 large ones 😀
Lol- thanks for letting us know!
Do you happen to know if you made cupcakes how many it would make???
I’m in the middle of making cupcakes with this recipe right now. From the looks of it, it’s going to make about 3 dozen. I have my 2nd dozen in the oven now.
Wow. This just might be the onus I need to get out and make a much needed grocery shopping trip today. . .
I just made this cake and it is delicious! It took me 3 hours and 15 minutes total. It looks gorgeous though, and my husband really liked it. It was fun making with my 5 year old daughter. Very delicious!!
This is cake is so wonderful!!!! I have NEVER been good at making chocolate frosting and I was able to do this and make it look good!! Perfect cake recipe and perfect frosting recipe. I followed each step exactly and it turned out perfect!! Thanks for the great recipe! 🙂
I made this for my husband’s b-day and it was sooooo good! The only change I made was to put chopped roasted salted almonds on the outside of the frosting like the blackout cake from cheesecake factory. Yum, Thank you
I made this cake with the frosting over the weekend for my Father-in-Law’s birthday and it was a HUGE hit!! The cake was good, but the frosting was amazing!!! It was so light and fluffy, yet had a good deep chocolate taste. I could have just eaten the frosting on it’s own (and I might have…a little). What really impressed me was that I was worried there wouldn’t be enough frosting (my husband’s family has a high ratio of frosting to cake requirement) and I actually had some extra, so it worked out perfectly!! I will definitely be keeping this recipe and be reusing it again!!
My birthday is not until next week but I am making my HUSBAND make this for me today….a pre-birthday cake! YUMMY.
I am such a big fan of Cook’s Illustrated, America’s Test Kitchen and Cook’s Country. You’re so right, that their ingredients and methods shouldn’t require any improv. If I follow their recipe, as written, I’ve always had great result. Beautiful job on frosting the cake!
I love Cook’s Illustrated and I love this cake. They can be pretty particular, but it is totally worth it!! I should also say that I learned about your blog a couple of weeks ago when my mom bought me your cook book. I love your stuff!! Simple and yummy!! I’m actually a bit obsessed with America’s Test Kitchen and rank you guys right up there with them!
I am a bit obsessed with america’s test kitchen too….which is why I Love,Love, LOVE “Cooks’ Country” Saturdays on PBS It is the team for America’s Test Kitchen. 🙂