Today I’m going to show you how to make a fun Thanksgiving craft perfect for both kids and adults! These darling turkeys are made from candy and completely edible! They are a fun activity for holiday parties, family nights, or just for fun. I’m also going to show you how to make a great little pilgrim hat at the end as well.
Ingredients Needed
Turkeys
- Double stuff Oreo cookies – Yes, the double stuff is important. You need the extra room to attach the candy corn feathers!
- Candy corn – Some people have a strong aversion to candy corn. Other times it can be hard to track down. In either case, readers have reported they’ve used Mike and Ikes in place of candy corn and that it works well.
- Whoppers
- Mini peanut butter cups – Readers have reported success with marshmallow filled cups as well as Rolos in place of peanut butter cups.
- Chocolate frosting, yellow frosting, red frosting (optional) – For these kinds of things I love to use the little pre-filled tubes of colored frosting you can buy in the baking aisle. The chocolate is easy to make, and homemade actually works a little better because you can make it stiff. However, for the colored details like yellow and red, these little tubes are great. It doesn’t really matter what they taste like and they last forever (which is both cool and disturbing at the same time.) I’m using store-bought tubes for everything here purely for convenience- works great!
- Black sprinkles – Optional, for eyes.
Pilgrim Hats
- Regular size marshmallows – The standard size you would use for s’mores.
- Fudge stripe cookies
- Chocolate chips or chocolate flavored candy melts – For dipping.
- Yellow frosting – For buckle.

How to Make Oreo Turkeys and Cookie Pilgrim Hats
Oreo Turkeys
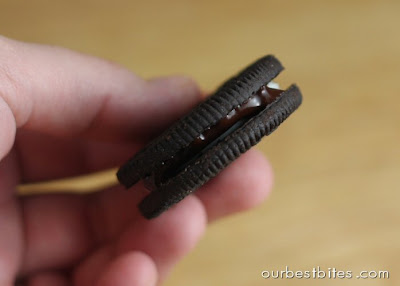
- Grab a cookie. You don’t have to put frosting in there, but I like to because it holds in the candy corn a little better. Just give it a little squeeze of chocolate.
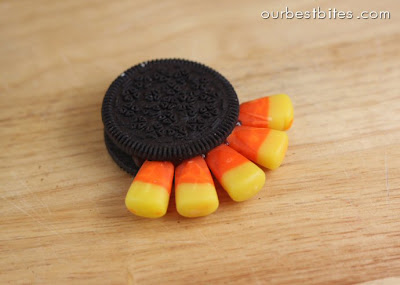
- Then stuff in your candy corn feathers. If you’re in some sort of candy corn shortage, you can cut off the white tips to use later for your beaks. I think the candy corn sticks in better with the tip so I leave it on. Go ahead and do all of the cookies through this step.
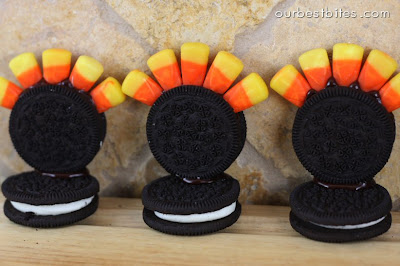
- Next, put a dab of frosting on the opposite end of the cookie and secure it to the “base” cookie. It helps to place them next to a wall as they dry so they stay put.
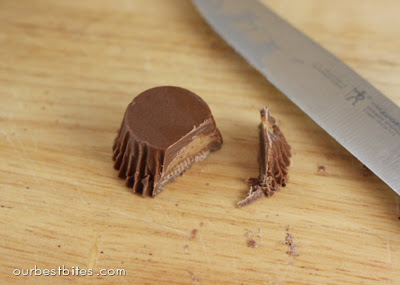
- While those are drying, unwrap your peanut butter cups. Place your peanut butter cup upside down then take a sharp knife and cut a sliver off one end. (I don’t need to tell you what to do with the sliver, do I?) It helps to gently cut in a sawing motion so you don’t break the PB cup. (Although I wouldn’t have to tell you what to do with a broken one either, would I?) Once those are ready, flip your cookies over, but you may find it’s easy to keep them next to the wall. My frosting was a bit soft, so they needed the extra support.
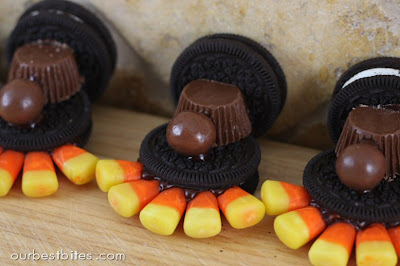
- Place a dab of frosting on the peanut butter cup, and place it on the cookie as pictured.
- Now those little guys will need heads, so glue a whopper on there with frosting as well. I put frosting on the side of the whopper that hits both the cookie and the PB cup. We wouldn’t want a turkey running around with its head cut off, would we?
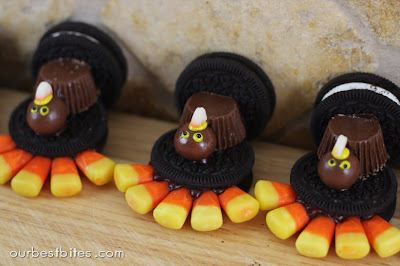
- While they’re still lying there, use a dab of frosting (I use yellow) and glue on the white tip of a candy corn for a beak. Put two yellow dots on for eyes, and for the black spots in the eyes you can use a dab of chocolate frosting, or a mini chocolate chip, or a little sprinkle like I’ve used. A sprinkle is really the perfect size if you have them.
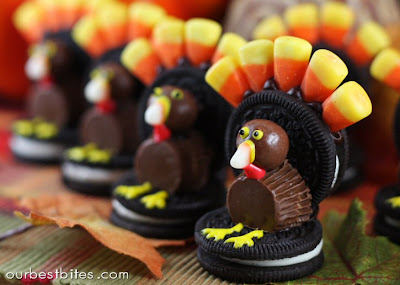
- Once the beak is secure, you can flip them over and draw on some little yellow feet. If you have red frosting too (usually comes in a set with the tube of yellow) you can add a little wattle. And there you go, cute as can be!

Storing and Other Tips
- If you make these a day ahead of time, store them in an airtight container on the counter. This will help the cookie not go stale!
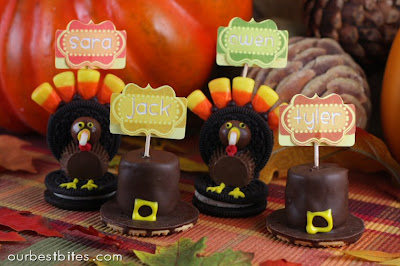
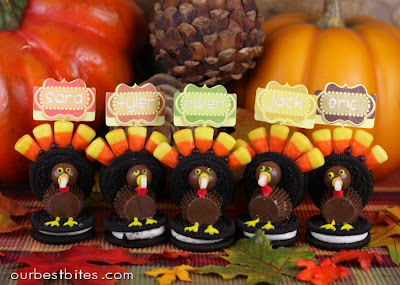
- These make really cute place card holders too, for either a kid, or adult table! How cute is my little turkey family? Stick one on each plate and everyone will say “Awwwwww….” If you have kids old enough to handle making them, it’s a fun project for them to be in charge of.
- If you need to transport these, they fit perfectly in the bottom of a muffin tin.
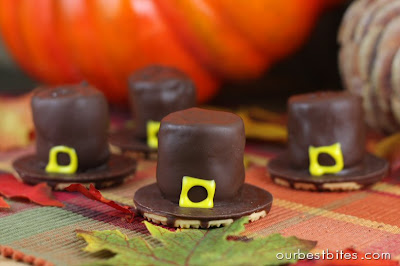
- Oreo turkeys are also also darling combined with pilgrim hats (below).

Pilgrim Hats
- Melt some chocolate or chocolate flavored candy melt in the microwave.
- Attach marshmallows to skewers or forks and dip.
- Allow chocolate to harden and then use a dollop of melted chocolate to attach them to an upside-down fudge stripe cookie.
- Use yellow frosting to draw a buckle and you’re good to go! (Pretty much the Thanksgiving version of the Halloween witch hats seen in this post!)
Frequently Asked Questions
Can I make these allergy friendly?
There are so many allergy friendly imitations of these ingredients. Almond butter cups, gluten free sandwich cookies, dairy free chocolate, etc. It should be fairly easy to track down ingredients that will work for you!
How do I make nametags?
Keep it simple and write names on a piece of paper, tape them to a toothpick, and pop them in. You can also find already made tags to write or print on, or design your own to print and cut out.
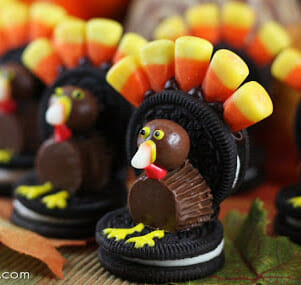
Oreo Turkeys and Cookie Pilgrim Hats
These easy, edible Thanksgiving crafts make great placeholders on the dining table and are especially fun to make with kids!
Ingredients
Oreo Turkeys
- Double Stuff Oreo Cookies (not regular or there's not room for the candy corn) 2 per turkey
- Candy Corn 6 per turkey
- Whoppers 1 per turkey
- Mini peanut butter cups 1 per turkey
- Chocolate frosting See notes
- Yellow Frosting See notes
- Red frosting Optional, for waddle
- Black sprinkles or mini chocolate chips Optional, for eyes
Cookie Pilgrim Hats
- Regular marshmallows (standard s'mores size)1 per hat
- Chocolate chips or chocolate flavored candy melts If using chocolate chips, add 1 tsp shortening per cup of chocolate chips
- Yellow frosting
Instructions
Oreo Turkeys
- Grab a cookie. You don’t have to put frosting in there, but I like to because it holds in the candy corn a little better. Just give it a little squeeze of chocolate.
- Then stuff in your candy corn feathers. If you’re in some sort of candy corn shortage, you can cut off the white tips to use later for your beaks. I think the candy corn sticks in better with the tip so I leave it on. Go ahead and do all of the cookies through this step.
- Next, put a dab of frosting on the opposite end of the cookie and secure it to the “base” cookie. It helps to place them next to a wall as they dry so they stay put.
- While those are drying, unwrap your peanut butter cups. Place your peanut butter cup upside down then take a sharp knife and cut a sliver off one end. (I don’t need to tell you what to do with the sliver, do I?) It helps to gently cut in a sawing motion so you don’t break the PB cup. (Although I wouldn’t have to tell you what to do with a broken one either, would I?) Once those are ready, flip your cookies over, but you may find it’s easy to keep them next to the wall. My frosting was a bit soft, so they needed the extra support.
- Place a dab of frosting on the peanut butter cup, and place it on the cookie as pictured.
- Now those little guys will need heads, so glue a whopper on there with frosting as well. I put frosting on the side of the whopper that hits both the cookie and the PB cup. We wouldn’t want a turkey running around with its head cut off, would we?
- While they’re still lying there, use a dab of frosting (I use yellow) and glue on the white tip of a candy corn for a beak. Put two yellow dots on for eyes, and for the black spots in the eyes you can use a dab of chocolate frosting, or a mini chocolate chip, or a little sprinkle like I’ve used. A sprinkle is really the perfect size if you have them.
- Once the beak is secure, you can flip them over and draw on some little yellow feet. If you have red frosting too (usually comes in a set with the tube of yellow) you can add a little wattle. And there you go, cute as can be!
Cookie Pilgrim Hats
- Melt some chocolate or chocolate flavored candy melt in the microwave.
- Attach marshmallows to skewers or forks and dip.
- Allow chocolate to harden and then use a dollop of melted chocolate to attach them to an upside-down fudge stripe cookie.
- Use yellow frosting to draw a buckle and you’re good to go!
Notes
- Note on frosting: For these kinds of things I love to use the little pre-filled tubes of colored frosting you can buy in the baking aisle. The chocolate is easy to make, and homemade actually works a little better because you can make it stiff. However, for the colored details like yellow and red, these little tubes are great. It doesn’t really matter what they taste like and they last forever (which is both cool and disturbing at the same time.) I’m using store-bought tubes for everything here purely for convenience- works great! You could also use melted chocolate to hold everything together.
- Note on candies and allergies: It should be pretty easy to find allergy friendly versions of most ingredients. Readers have reported success using Rolos in place of peanut butter cups and Mike and Ikes in place of candy corn.
- If you make these a day ahead of time, store them in an airtight container on the counter. This will help the cookie not go stale!
- These make really cute place card holders too, for either a kid, or adult table! How cute is my little turkey family? Stick one on each plate and everyone will say “Awwwwww….” If you have kids old enough to handle making them, it’s a fun project for them to be in charge of.
- If you need to transport these, they fit perfectly in the bottom of a muffin tin.
Cost: $8
Did You Make This Recipe?Snap a picture, and hashtag it #ourbestbites. We love to see your creations on our Instagram @ourbestbites!


Questions & Reviews
I LOOOOVE these!!!!!
You are so creative! I love your blog, it has the best treats and ideas!!
these are so cute I can't stand it!!!
you guys are dangerous!!! 😉
Now the little man (errr, the almost 9yo) is requesting these for his class party for Thanksgiving.
You guys are sure keeping me busy with your recipes!! LOL
any other ideas of what you can use in place of reeses cups since no peanut butter is allowed in any classroom treat?
I am in the same boat…my nephew is allergic to peanut…I was guessing that a Rolo would be a good substitute, and since they just *happen* to be my favorite, I was going to try those!
These are too adorable for words! I'd love to make them for my son's class but we're not allowed to bring anything with peanut butter in it. Any suggestions on a replacement for the peanut butter cups?
These are the cutest things! Thanks for posting them.
I am excited to surprise my family bringing them to our Thanksgiving dinner! I love it!
A little to time intensive for the pot luck after church on Sunday, but it is tempting because I think they are way adorable.
These are the cutest things! Thanks for posting them.
I am excited to surprise my family bringing them to our Thanksgiving dinner! I love it!
A little to time intensive for the pot luck after church on Sunday, but it is tempting because I think they are way adorable.
Just want you to know that it is difficult to find candy corn around here after the 2nd week in October and impossible to find after Halloween. Wish I had seen these turkeys earlier so I know to save some 🙁
I actually ran into the same problem and them found some candy corn in the Albertson’s regular candy aisle. Score!!!
Super cute!! I haven't read the comments yet, so someone else might've already named it, but I think it's called a wattle. I'll be sure to post a link on ediblecrafts.craftgossip.com!
So cute – I love the idea of letting kids make their own while you are finishing up all of the Thanksgiving preparation!
Heidi @ http://everydayfamilies.blogspot.com/