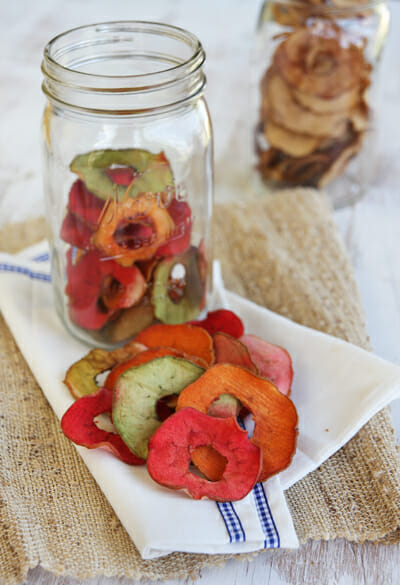
Raise your hand if you hear the phrase “Mom I’m huuuungry” about 437 times a day. How children with such tiny tummies, who seemingly eat all day long can be in a constant state of hunger is beyond me. And I even cook for a living! The one thing that fortunately never lacks in our house is food, yet they seem to always need a snack. One thing I care a lot about is having healthy snacks around, for both the kiddos and the grown-ups, because we are definitely a family of snackers. And while my kids love to eat fruit, it’s always a bonus when they don’t realize they’re eating something healthy. These apple chips totally satisfy a craving for the munchies, and my kids especially love the fruity-flavored colorful ones you see in that photo. Apple chips are obviously easy to make in a dehydrator, but just like our Homemade Fruit Roll-ups, you can make them at home without any special equipment. Keep reading to see how it’s done!
These are pretty darn easy, and although they do take quite a bit of time to cook, the actual work you have to put in is less than 5 minutes. Your oven will do the rest! First up, remove the cores of your apples. If you don’t have a little apple coring gadget, the sharp end of a vegetable peeler works great. I just do one side of the apple, about half way to the core, and then flip it over and do the other side.

You’ll need these thinly sliced, and it’s also helpful to have then evenly sliced. If you have some thick ones, and some thin ones, they’ll take different amounts of time to cook. So if you’re using a knife, take some care to cut in thin and even. I use a mandoline, which really comes in handy here.

You don’t have to put a darn thing on them- they’re great baked up plain, but a little sprinkle of cinnamon is great too. I usually do half and half. What works best is if you sprinkle it on first and then rub it in a little.

Just use clean hands and run your finger around each one, it goes super quick.

My kids’ favorite, however, are fruity apples! Sounds ironic since apples are fruit, I know. My friend Britanie made these in her dehydrator for a workshop we did at church once and I thought they were so fun. All you need is a packet of Jell-O. I use sugar free, and with a light hand, just sprinkle it over the apple slices as evenly as you can. Try to avoid getting it all over the baking sheet. You don’t need to use a whole packet, just use enough to give all of the apples a nice coat.

After that, put your pans in a 170 degree oven. It’s super low, basically just on ‘warm’ so I just leave it on and go about my day, coming and going as usual. Baking time will depend on your oven, and your apples, but I usually leave mine in about 7 hours. They should look shriveled up a bit, and the plain apples get a little golden brown. They should feel pretty dry to the touch. At this point, I just turn off the oven and leave them there until they’re completely cooled. They won’t be crunchy until they’re cool.

What I usually do is pop them in my oven in the morning, let’s say 10-11am. Then I turn off the oven around dinner time, and before I go to bed I take them off the sheets and put them in an airtight container, like a mason jar.

Like I said, the process is long, but the work load couldn’t be easier! What results is light, crispy, flavorful chips, perfect for munching on.

My kiddos always go straight for the fruit flavored ones. The added flavor is very mild, it just adds a hint of sweetness and lots of fun colors!

I love that my boys are obsessed with these, because they’re so healthy. They’ll pick these over fruit snacks any day.
And I don’t blame them! They’re one of my favorite snacks too.

The apples shrink up so much to make the crispy chips, that I sometimes don’t let my kids notice I’m baking them. That way I can do a few batches over the course of a few days and fill up a few jars- because they eat them super fast!

It’s a pretty cute gift, too. Fill up a mason jar and tie a ribbon around it and you’re done. I could easily eat that whole jar (which is about 2 whole apples). Yum!

Oven Baked Apple Chips
Recipe by Our Best Bites
Ingredients
apples
optional: Fruit flavored gelatin, any flavor
optional: ground cinnamon
Instructions
Slice apples in uniformly thin slices (1/8 of an inch or less) and place on a parchment or silicone baking mat lined baking sheet in an even layer. Slices can touch each other, but try not to overlap. Fit as many apples on a sheet as you can (they shrink a lot!) If desired sprinkle with cinnamon and gently rub in. Alternately you can sprinkle with dry fruit flavored gelatin (ignore instructions on box and just sprinkle the dry powder).
Bake apples at 170 for 6-8 hours, until dry and slightly shriveled, and curled up around edges. Turn off oven and leave door shut until completely cooled. Remove apples from baking sheet and store in an airtight container.
If you missed yesterday’s giveaway, check it out! We sent so much traffic their way, it was a little slow yesterday, so head over today if you missed it!


Questions & Reviews
I tried these and mine never got crispy. They are still a little chewy and stuck to the parchment paper – maybe I put too much jello on and that’s why they’re sticky? Any suggestions on how to make them crisp up and not stay sticky? They are delicious either way, but can’t put them in the jar because they stick to the sides. Thanks for the great idea!
Did they cook long enough? They may just have needed more time in the oven. That- or too much jello!
I think these would be pretty good lightly salted- the salt could be a nice contrast to the sweetness of the apple, like salted chocolate or salted caramel. I like to put a tiny bit of salt on watermelon when I eat it for the same reason.
Hi 🙂 Is it 170 C or 170 F? And is it possible to cook them quicker at a higher temperature?
That’s F, and when you go higher/faster they don’t really dry out, they bake- so you’ll get a different result.
How long do these last?
We’ve always eaten them super fast! But I think if well sealed they’ll last for up to a month or two.
I know the Jello ones are pretty, but if anyone gifts them or shares them with those outside their immediate family, please let them know that they contain artificial colors, flavors and sweeteners. These things cause real problems for some people. Even in seemingly small quantities.
What kind of apples work best? Can’t wait to try!!
Please post “F” next to your oven degrees to help the non-USA readers not get confused, as for the apple recipe, 170C is a hot oven. 170F.. just warm.
Great ideas. Love these recipes. Nice blog!
Boa! 170ºF = 76,66ºC
Hi Sara! These look divine!!! Im super excited to try these out as soon as Im out for my next grocery trip. I don’t have kids, but Im definitely saving this for when we do because its such a healthy alternative and I love that you can still make it super fun by adding the jello coloring!!
I do have one question, I tried to read through all of the comments and the entire post before asking but I wasn’t able to find anyone else who asked or anywhere where it was mentioned so Im truly sorry if it already was and you are re-answering this!
I’m sure you guys go through these so fast that you might not be able to answer this, but do you know how long they last stored in the glass containers? I doubt that they will last long in our house either but Im always looking for new healthy snacks to store for easy grab and go!
Thanks so much for posting this, I can’t wait to try it out!!
~Bekah
I’ve never really had them last long enough to know, lol. But I’d say a while! I know, super helpful, right??
These look like so much fun! Are you sprinkling/rubbing both sides of the slice, or only one?
Carlyn
I sprinkle both, but either or 🙂
Thanks for posting this…I know I’m a year late commenting 🙂 Was looking for a snack for the kiddos. I always lament that I don’t own a dehydrator because my husband freaks out if I use the oven for too long because of cost. He’s the practical one, I’m not. At first I thought you had sprinkled the apples with kool-aid…I wonder how that would taste?!?!