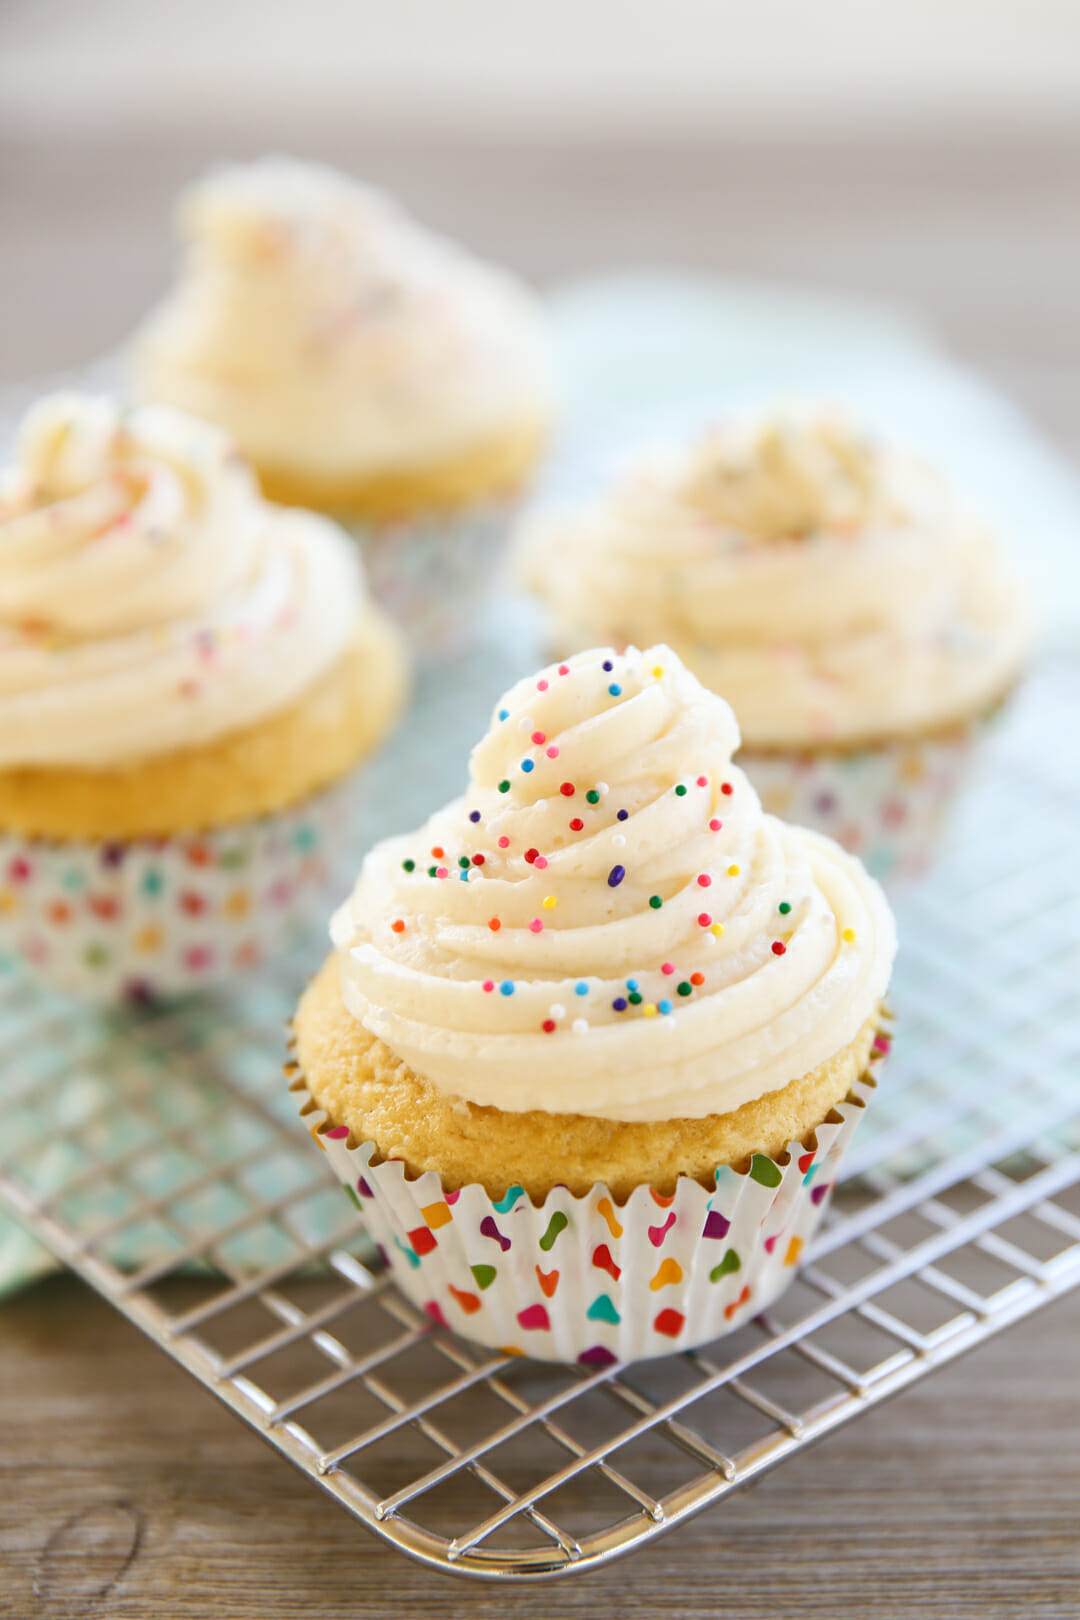
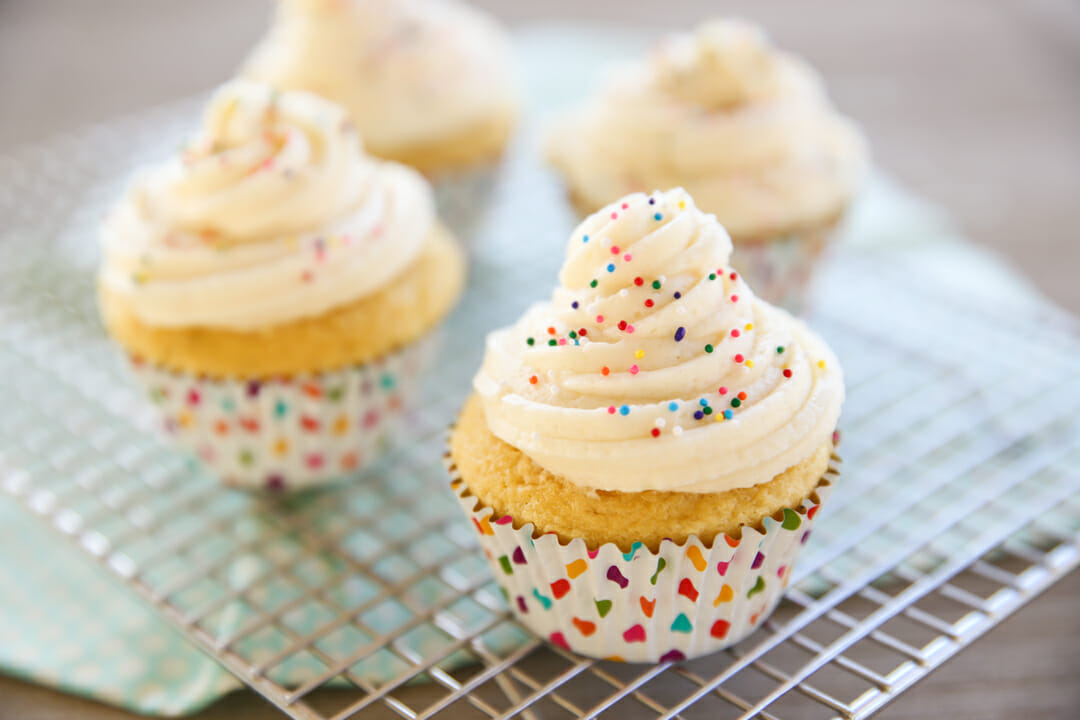
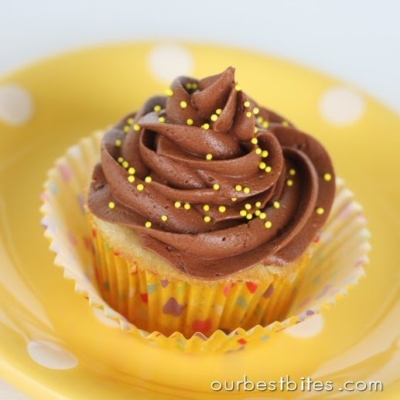
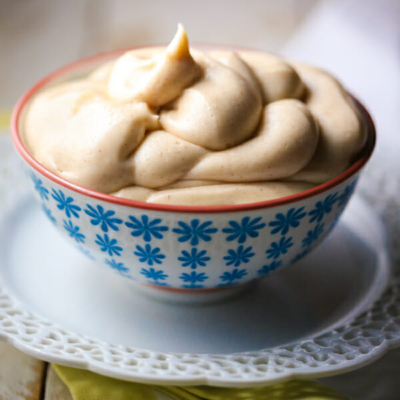
This Perfect Cupcake Frosting and Filling is known as Ermine Frosting, or sometimes referred to as boiled milk frosting, because it begins with a cooked roux of flour and milk. That might sound incredibly strange for a frosting recipe, but trust me! I’d say it’s the perfect frosting. It’s not so thick and sweet that you need a gallon of milk to get it down your throat. It’s mild and smooth, and light as air. I also love it because it doesn’t take away from a good cupcake like other really rich frostings can. It’s often the traditional frosting used with Red Velvet Cake. This frosting has a similar taste and texture to a Swiss Buttercream, but with way less effort. Try this unique frosting recipe and you’ll be hooked!
Ingredients Needed
This is just a preview of ingredients and method, keep scrolling for full printable recipe.
- All purpose flour
- Milk – Whole milk is best, but I’ve used non-fat when it’s all I’ve had and it actually does work ok as well.
- Butter – Use real butter here!
- Granulated sugar
- Vanilla extract – Or other extract or flavoring oil of choice.
How to Make Perfect Cupcake Frosting and Filling
Step 1: Make the Cooked Flour Base
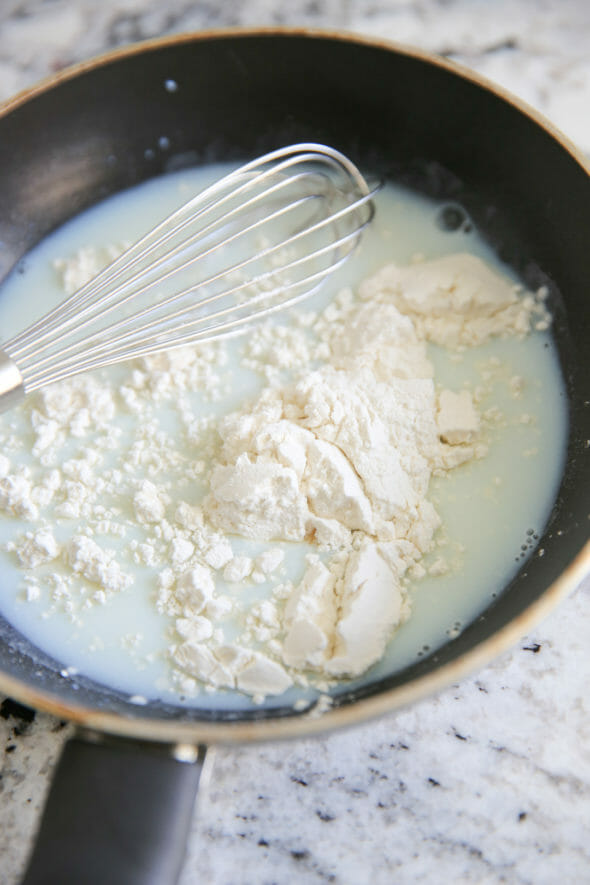
- The frosting starts out with a mixture of all purpose flour and milk. And even though I’m showing it here being whisked together, I’ve actually found you’ll get a much smoother result if you mix this part in a blender first and then pour it in your pan.
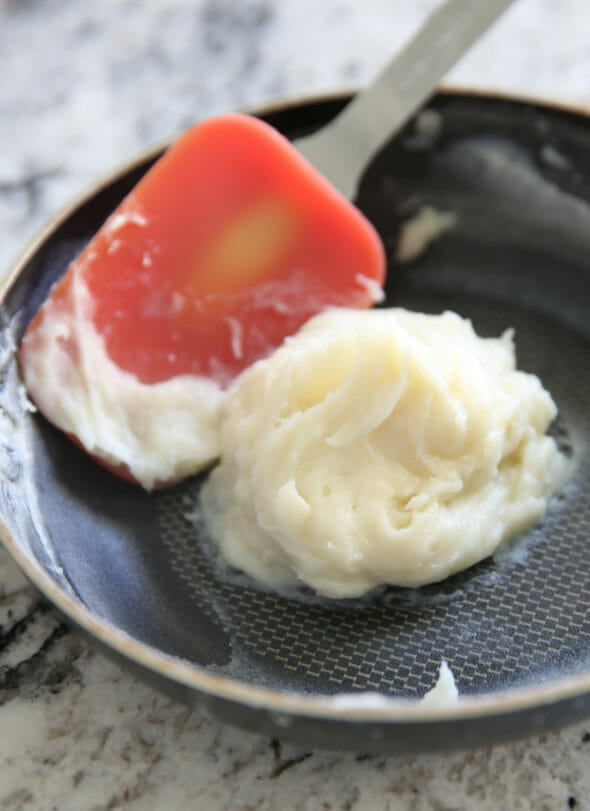
- Now comes the weird part. You’re going to cook this mixture until it gets thick–it happens fast and you’ll want to have a rubber spatula and constantly smash/stir it to keep it smooth. I usually take it off the heat when it looks like this photo above. There are still some wet spots but as you stir it all comes together like this: Don’t taste it. It’s not frosting yet! Pop it in the fridge; it needs to cool completely (I sometimes pop it in the freezer if I want it to cool fast.) Put it in a bowl and smoosh it around and stir every few minutes to cool it off.

Step 2: Mix it up!
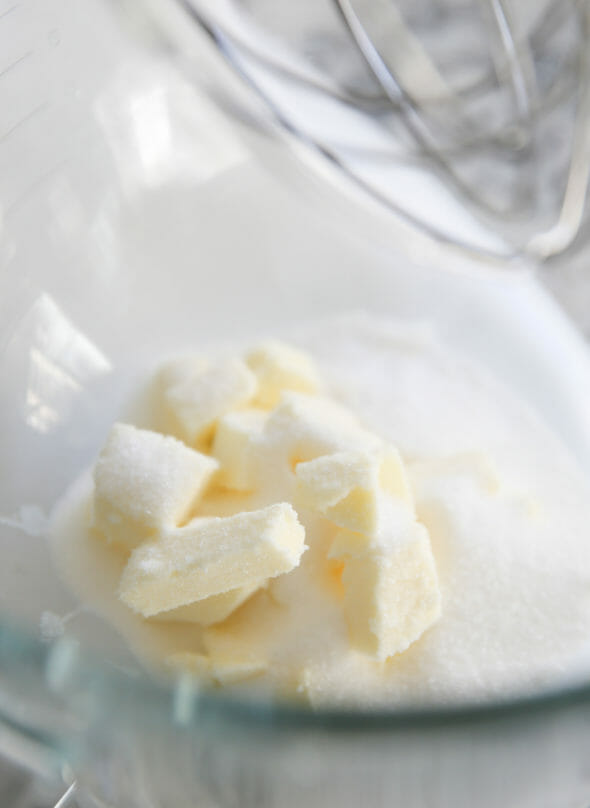
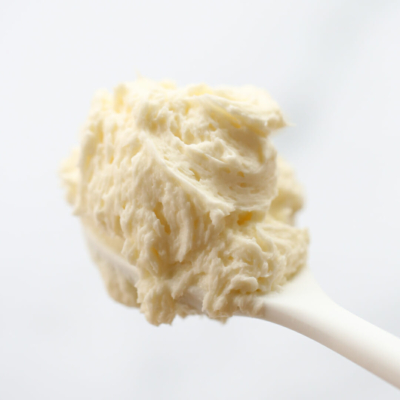
- When the flour mixture is chilled, place some real, high-quality butter (definitely no margarine) and granulated sugar (not powdered sugar!) in a stand mixer. Whip it up for a few minutes so it’s light and creamy. I use the whisk attachment on my Kitchenaid, but any paddle should work.
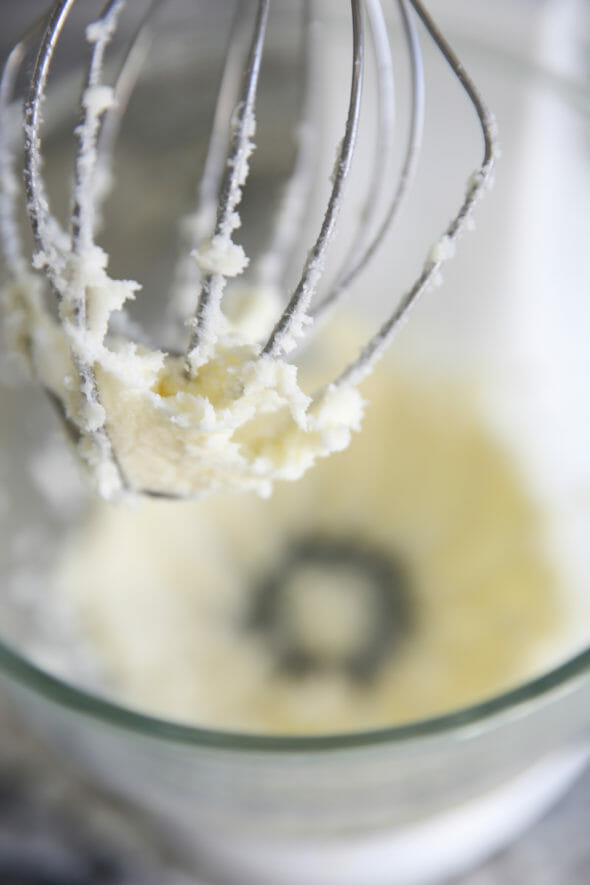
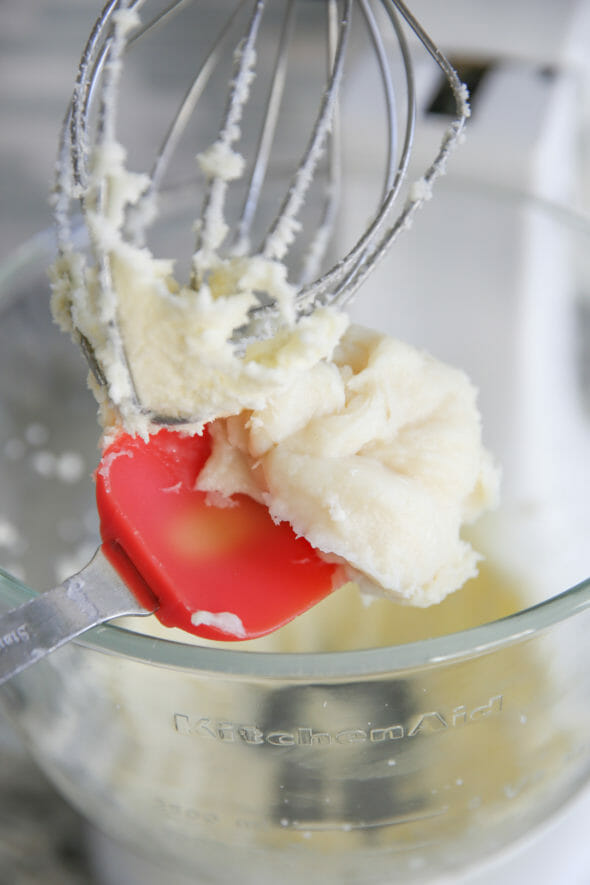
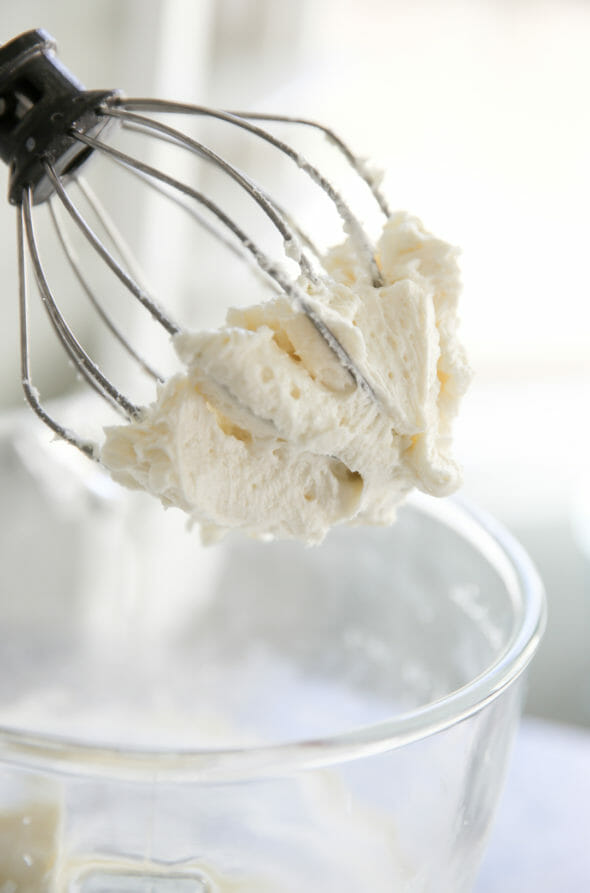
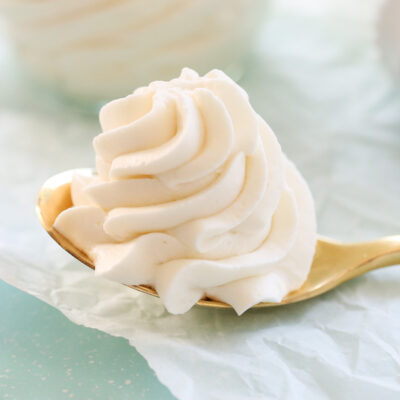
- Then you’ll add that glob of flour. I know. Weird! I’m warning you right now it’s going to look weird at first. Like, what the heck did I do weird. But keep going. You’ve got to whip it for a long time for all the sugar to dissolve and everything to come together. Don’t be startled if it looks curdled. Eventually it will look like fluffy soft clouds of heaven. I usually give it a little taste and if I can still feel quite a bit of granulated sugar I keep on whipping. Sometimes it takes 5 minutes, other times I let it go for almost 10 or so! It’s worth it for this silky, fluffy, magical mixture. Pipe it or spread it or fill it or whatever. Anyway you eat it, it’s fantastic.
Storing and Other Tips
- Store finished frosting or frosted desserts, covered tightly, in the refrigerator. Allow to come to temperature for 20-30 minutes before serving.
- If using frosting within a few hours of making the frosting or within a few hours of frosting cakes or cupcakes, simply cover and store at room temperature until time to serve.
- This frosting can be soft or even melt if it gets too warm. If needed, pop the whole mixing bowl in the fridge for 15 minutes and rewhip to help it hold its shape.
- Don’t leave frosted desserts sitting in the sun or in a warm environment for too long with this frosting or it may soften/melt!
Additional Tips
- Use real butter, and a good name-brand. Cheap butter does weird things.
- If you beat for the 6-8 minutes and the mixture still looks strange, beat longer and at a higher speed if you can. It should come together, but it takes a little patience!
- I personally think this frosting is best eaten fresh. You can store for a few hours at room temperature, or try storing in the fridge overnight, letting it come to room temperature on its own, and then re-beating to fluff. If you want to frost cupcakes or a cake the day before, refrigerate and just let come to room temp after.
- Add extracts to your hearts content; lemon and almond are both wonderful! Food coloring is also okay.
- The white sugar can be exchanged for brown. Try 1/2 white 1/2 brown for a warm caramel flavor.
- Do not try to make other substitutions or additions. Sour cream, fruit purees etc. can do disastrous things. Some people have had amazing success, just experiment at your own risk.
- If trying to decide whether or not to double it- double it. Chances are you’ll want more. It’s a rather small batch, but on purpose.
- 1 batch will not look like much, but it can spread on (just with a knife, a normal amount) 24 cupcakes. If you want to pipe it thick, definitely double it.
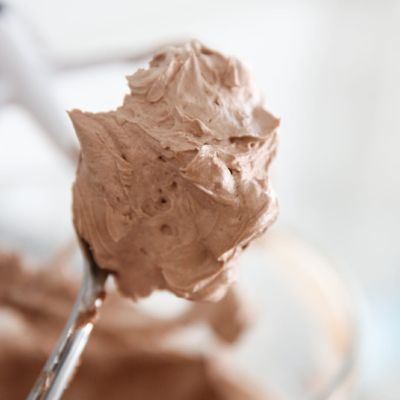
- Looking for Chocolate? This Chocolate Frosting isn’t exactly the same, but very similar!
Frequently Asked Questions
Yes. Brown sugar gives this frosting a deeper, almost caramelly flavor. Just be sure you’re using fine brown sugar (some brands like the organic one sold at Costco have quite large grains) and it may help to sift it first. When creaming with the butter, give it some extra time and make sure the sugar has dissolved well before adding the flour mixture to ensure a smooth texture.
This frosting is best flavored with extracts or flavoring oils. If you are looking for similar flour-based frosting, try this Chocolate Frosting.
Yes. If making just a couple of hours before use, cover tightly and store at room temperature (if your kitchen isn’t too warm) until ready to use. You may need to rewhip it before use.
If making a day or two in advance, cover tightly and store in the refrigerator. Before use, bring to room temperature and rewhip briefly to restore texture.
Yes, add gel or paste food coloring (not liquid) when you add the flour mixture.
Perfect Cupcake Frosting and Filling
Ingredients
- 3 tablespoons all-purpose flour
- ½ cup milk whole milk is best, but I’ve used non-fat when it’s all I have and it’s actually fine
- ½ cup real butter slightly softened (I prefer salted, but you can use also unsalted and add salt to taste)
- ½ cup granulated sugar
- 1 teaspoon vanilla extract or other flavor if you wish
Instructions
- Whisk together the flour and the milk (you could also run it through the blender first). Heat in a small sauce pan on medium heat.
- Whisk continuously until it starts to thicken. Let it cook, while stirring with a rubber spatula, until you can start to see the bottom of the pan. Continue to cook until mixture has the consistency of thick pudding or paste.
- Put mixture in the fridge and let it cool completely; it's fine if it stays in there long enough to get chilly, you just don't want it warm at all. As it's cooling, feel free to stir it occasionally to speed up the process and keep it from forming a crust on top. You can also do this quickly in the freezer, just keep an eye on it so it doesn't freeze.
- Using the whisk attachment on an electric stand mixer, beat the butter and the sugar for a minute or two until well combined and fluffy. While beating, add in the thickened milk mixture, any food coloring, and the flavor extracts. Beat to combine and then scrape down the sides. Mixture will separate and look messy, keep beating! Continue beating until mixture comes together and is light and fluffy, about 7-8 minutes, but time varies. Take a sample of frosting between your fingers; frosting is done when light and fluffy and sugar granules are dissolved.
Notes
- Store finished frosting or frosted desserts, covered tightly, in the refrigerator. Allow to come to temperature for 20-30 minutes before serving.
- If using frosting within a few hours of making the frosting or within a few hours of frosting cakes or cupcakes, simply cover and store at room temperature until time to serve.
- This frosting can be soft or even melt if it gets too warm. If needed, pop the whole mixing bowl in the fridge for 15 minutes and rewhip to help it hold its shape.
- Don’t leave frosted desserts sitting in the sun or in a warm environment for too long with this frosting or it may soften/melt!
- Use real butter, and a good name-brand. Cheap butter does weird things.
- If you beat for the 6-8 minutes and the mixture still looks strange, beat longer and at a higher speed if you can. It should come together, but it takes a little patience!
- I personally think this frosting is best eaten fresh. You can store for a few hours at room temperature, or try storing in the fridge overnight, letting it come to room temperature on its own, and then re-beating to fluff. If you want to frost cupcakes or a cake the day before, refrigerate and just let come to room temp after.
- Add extracts to your hearts content; lemon and almond are both wonderful! Food coloring is also okay.
- The white sugar can be exchanged for brown. Try 1/2 white 1/2 brown for a warm caramel flavor.
- Do not try to make other substitutions or additions. Sour cream, fruit purees etc. can do disastrous things. Some people have had amazing success, just experiment at your own risk.
- If trying to decide whether or not to double it- double it. Chances are you’ll want more. It’s a rather small batch, but on purpose.
- 1 batch will not look like much, but it can spread on (just with a knife, a normal amount) 24 cupcakes. If you want to pipe it thick, definitely double it.
- Looking for Chocolate? This Chocolate Frosting isn’t exactly the same, but very similar!


Questions & Reviews
I am making this tomorrow and I need to ask a question…I hope it isn't a silly one..:)
What temp should the butter be when I beat it with the sugar? Is room temp okay or should it be cold, straight from the fridge?
Thanks!!
Heidi–Bread flour has a lot more gluten than all-purpose flour, so I'm thinking you may run into some problems. Based on the comments we've gotten, that this recipe is already a little on the tempermental side, so if it were me, I probably wouldn't tempt fate…get thee to a grocery store, girl!! 🙂
I ran out of all-purpose flour and all I have is bread flour, do you think it will still work? I can't wait to top the strawberries and cream cupcakes with this!
Although this was the strangest frosting I have ever made – the process was strange it turned out wonderful! I love the texture, how light and fluffy it is and the taste is awesome. I am a frosting snob and truly only eat cake for the frosting so it has to be good! I made two batchs. The first one I think I cooked the flour/milk mixture too fast and too hot and it got real thick – It was so thick I couldn't put it threw the strainer so I didn't but it still turned out great. The second batch I did a better job in getting the pudding consistency and it worked with the strainer. Thanks girls- I have a new favorite frosting recipe.
I wanted to wait until after I'd made this a couple of times to write a review… I made it for the fourth time yesterday, and have a few observations to share.
1. BEATING TIME. The first time I made this I set my stand mixer on speed 6 and beat it for 7 minutes. I kept peaking in at it, and at 7 minutes it looked like a disaster – separated, gloppy, curdled, and gross. I figured I had nothing to lose by continuing to beat it, so I did. By the time I hit 9 minutes it was starting to transform, and by 10 minutes it was perfect. So now I beat it on the speed 8 setting, and by 7.5 – 8 minutes, it is perfect.
2. "CHEAP" BUTTER VS. NAME BRAND BUTTER. For the reviewers who commented on the difference between "cheap" butter and name brand butter, I think there is some truth to this. With my first batch I used name brand butter and it turned out great. With the second batch, the small grocery store where I pick up last-minute items was out of the name brand unsalted butter, so I had to get the store brand. No big deal, right? WRONG.
I did everything with the frosting the SAME way I did the first time, and although it did eventually start to resemble frosting after a LONG beating time, the finished product was very… umm… well, greasy. If you looked at it closely, it looked like it was separated in some parts of the frosting (kind of like if you didn't scrape down the bowl very well and it wasn't well mixed, although that wasn't the case). I also noticed a strange "greasy" film on the inside of the mixing bowl that I had not noticed the first time around. The taste didn't seem to be much different (still tasted very good) – but I still ended up throwing it out b/c it did not LOOK appetizing at all.
I remade the frosting two days later with name brand butter and it turned out perfectly. I have no idea if this was a fluke or not, but I don't plan on chancing it again.
3. STORAGE & SHELF LIFE. I have had these babies out on my counter for as long as two nights/three days in a sealed tight storage container and they stayed very fresh and yummy.
Anyway, I can tell you from experience that the frosting keeps really well at room temp as long as its sealed tight. I did find that if you plan on keeping them for a couple of days, be sure to frost the cupcakes clear to the edge to keep the cake moist. Otherwise, the cake gets a bit dry around the edges.
A couple of random notes…
– This frosting is very white and beautiful, not off-white/yellow that you're used to seeing with homemade frosting with butter in them.
– This frosting is even more light and airy than I expected from reading the original recipe and reviews. The density REALLY is like whipped cream, but far more tasty! Yes, I know that you said it was… but I'm a seeing-is-believing kind of girl. 🙂
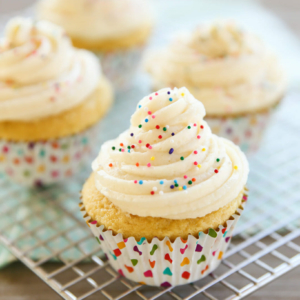
– I expected that this frosting may not hold up well to decor on top due to the light, airy texture – but it holds its own! I have used sprinkles, drizzles of chocolate, and even candy pieces – they all turned out perfect without pushing the frosting down or making it fall off the side.
– Sara is right about doubling the recipe. By the time you eat some and then pile it high on the cupcakes, one batch is for sure not enough for 24 cupcakes.
In the end I have to say that this is hands down one of the best frostings I've ever made, and it will continue to be a favorite of mine. Truth be told, I haven't made a "real" buttercream frosting since I found this recipe (and I might not for quite some time!) I think you could pile this stuff on just about anything and make it good! I just made them for a July 4th picnic and someone said they were glad that I "brought those cupcakes with the good icing!" 🙂 Thanks again for this awesome recipe Sara!
A couple of pics on my blog: http://palmerfamily.blogspot.com/2009/07/happy-independence-day.html
Awesome review. Thanks!
I second that–GREAT review! I tried making it the first time with a generic brand of butter, and while it was good tasting I agree that it had a kind of greasy film…it didn’t get quite as light as most people say, either. I also desperately wanted to know if I could make them today for a picnic tomorrow, so was happy to see that isn’t a problem as long as you don’t refrigerate them! I also thought your cupcakes on your blog turned out great! Thank you so much for taking the time to post such a helpful review! I’m off to buy some Land 0’Lakes butter and looking forward to frosting nirvana (something which I didn’t think existed outside of ganache…I hate powdered sugar frostings with a passion!!!). 🙂
THANK YOU! This frosting is amazing and SO easy. I have been looking for a perfect buttercream for my son's first birthday. Regular frostings are just WAY too sweet. I just whipped up a batch of this during naptime and it was so quick and it came together so quickly and perfectly. It leaves no oily weirdness and tastes like perfection- not too sugary, not too buttery. YUM!
Sara… THANK YOU! who would have thought white sauce could turn this butter frosting into silky and smooth mixture? It's also very light, very similar to swiss buttercream, but 30% less fat and sugar, I'll say! I tried this recipe for cupcakes frosting yesterday for a 3 years old who loves pink, skeptical at first.. but it turned out beautifully. Thanks again Sara! Well done.
Note, I kept the frosting in fridge for 1 hour and it turned curdly… I solved this by beating them for a good 5 minutes and it's silky smooth again.
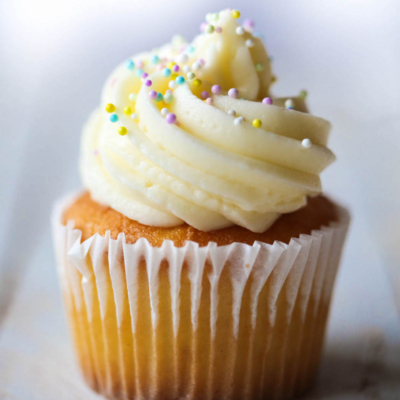
April–Someday we should do a tutorial on cupcake swirls! 🙂 It's really very easy–like, once you get the hang of it, it's much, much faster than icing them by hand.
Anyway, you'll need an icing bag (or a large, heavy-duty Ziploc bag), a Wilton 1M star tip, and a large coupler. You can get most of the Wilton tips and couplers at Walmart, but I've never been able to find the 1M star tip or large coupler there. I've seen them both at Hobby Lobby and Michael's.
Anyway, use the coupler to attach the tip to the bag and then fill the bag with icing. Pipe a swirl around the outside of the cupcake and then, while maintaining the pressure and not breaking the flow, make a smaller swirl on top of the big swirl and end with a little flourish. Does that make sense? It's a lot easier than it sounds. You could even get a cheap can of frosting to practice with. Anyway, let us know if you still have questions! 🙂
how do you *frost* the cupcakes? they look SO perfect in the picture. do you use a device or frosting bag?
how do you *frost* the cupcakes? they look SO perfect in the picture. do you use a device or frosting bag?