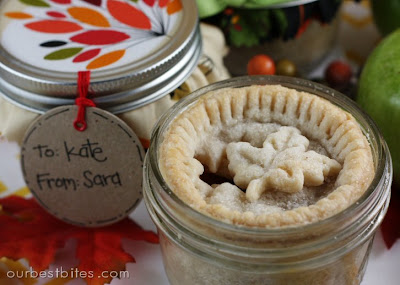
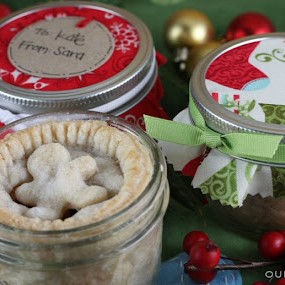
These are individual-sized pies made in little glass jars that can go straight from your freezer to your oven to your mouth. SO cute. You can make these with store-bought crust and canned filling or jazz it up with homemade like we do. These are just about the best little gift from the kitchen you could share with someone! Single Serving Pies in a Jar make great little gifts and are the perfect way to stock someone’s freezer with a little treat as needed.
Ingredients and Equipment Needed
This is just a preview of ingredients and method, keep scrolling for full printable recipe.
Ingredients
- Pie crust dough – You can buy this pre-made, but I like whipping up my own using this Light and Flaky Pie Crust recipe.
- Filling – You could absolutely fill with any pie fillings you like. We’re doing a fruit filling today.
- Prepared fruit – Diced apples, pitted cherries, etc.
- Sugar – Granulated or brown
- All-purpose flour
- Butter
- Spices and flavorings as desired – Cinnamon, nutmeg, vanilla, almond extract, citrus zest, etc.
- Crumb topping – Optional.
- Brown sugar
- All-purpose flour
- Oats
- Cinnamon
- Cold butter
- Other finishing options as desired – Butter, sanding sugar, egg wash, etc.
Equipment
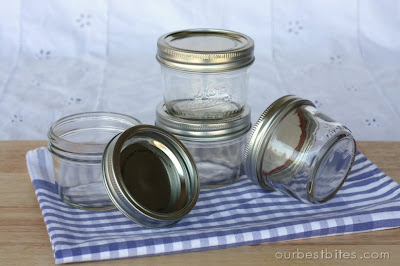
- Half-pint jars – You’ll need half-pint jars, but short and squatty instead of tall and skinny. Mine are made by Kerr. They hold 8 fluid ounces.
- Cookie cutters – Optional, for cutting out crust designs.
- Decorations for gifting, if desired – Cute circular labels, cotton fabric, and ribbon all make these adorable for gifting!
How to Make Single Serving Pies in Jars
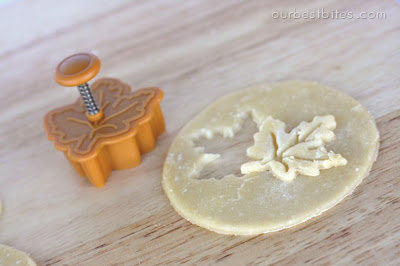
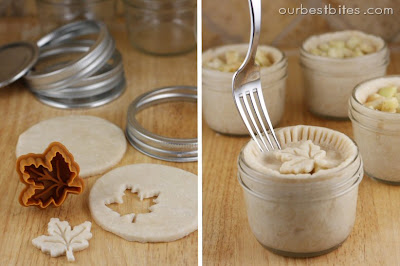
- Roll out a small handful of dough. This is just for the tops of your pies, so eyeball about that much. Grab the ring part of your jar and use that as your cookie cutter. Brilliant, right? Cut out the tops and set aside.
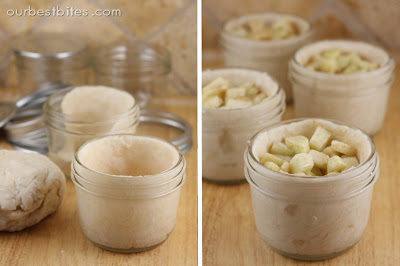
- Use the rest of the dough to line the jars. (No, you do not need to grease them) The great part is that there’s no rolling required! Just take little pieces and press them in. Make sure it’s pressed all the way up to the top of the jar, or pretty close to it.
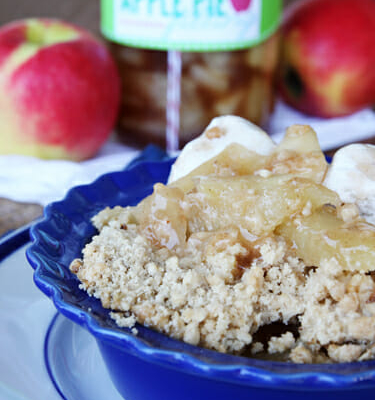
- Next it’s time to fill them up! We’re doing a simple apple filling but you could use any fruit you’d like or other pie fillings. I’m mixing up some diced, peeled apple with a little sugar, flour, and topping with butter.
- Next you just need to finish them off.
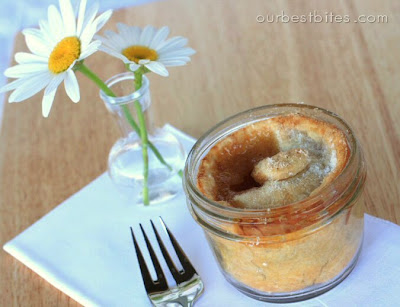
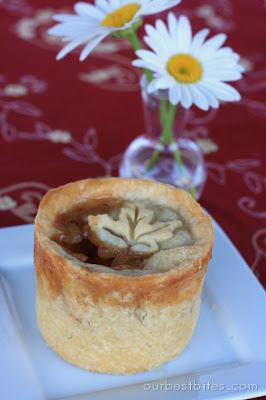
Option 1: Pie crust top. You’ll want to make sure steam can escape, so cut a slit or use a small cookie cutter to vent the circular pieces of dough you cut earlier. Pop a top on each pie and seal the edges with a fork or a finger. You can stop there, or do a quick egg wash or brush of melted butter and then sprinkle with sanding sugar.
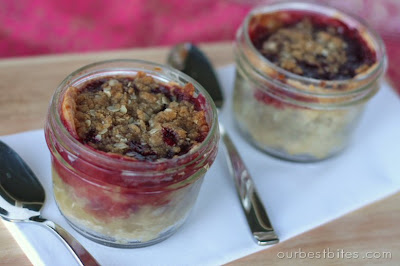
Option 2: Crumb topping. Mix up a quick crumb topping of brown sugar, all-purpose flour, oats, cinnamon, and butter. Divine among the pies, directly on top of the filling. - At this point you can choose to pop the lids on and freeze them for later, or bake right away. If frozen, you just remove the lid and pop directly in the oven to bake!


Storing and Other Tips
- These little pies stay ready-to-bake in the freezer for up to 2-3 months.
- After baking fruit pies, cover and cooled leftovers with their lids and store at room temperature for up to 24 hours or in the fridge for 2-3 days.
Frequently Asked Questions
Any fruit filling will work well! You could most likely use prepared canned fillings as well. Custard pies like pumpkin would not freeze well raw.
Yes, we’ve had lots of readers report this working well! If you’re looking for a filling recipe, give this Chicken Pot Pie recipe a try!
All I can say it that I’ve baked hundreds of these straight from the freezer to the hot oven and never once has a jar broken. But, for best safety practices, it’s best to put the frozen pies in a cold oven and let them heat gradually as it preheats. I’ve adjusted the instructions in the recipe card from the original instructions when this was first posted to reflect that recommendation!
One of the most common questions we get is about sending these overseas. I have not personally sent these so I cannot give advice from personal experience, however many people have left feedback. People have noted that putting the lids on the jars when the are still hot out of the oven and then letting them cool to room temperature helps “seals” them and keep them fresher longer. Note that the canning jars are purely for appearance and these are not shelf stable. I cannot tell you how long they will stay fresh, as environmental conditions (heat of travel vehicles etc.) would all affect the pies. Generally when shipping to soldiers overseas items need to stay fresh for 1-3 weeks. Many people have shipped the pies with success, but that’s all we can offer in terms of advice.

Single Serving Pie in a Jar
Equipment
- 4 Short half-pint canning jars with lids
- cookie cutters if desired, to vent and decorate pie tops
Ingredients
Pie Crust (store bought will also work)
- 1 ¼ cups all-purpose flour
- ½ teaspoon table salt
- 5 ⅓ tablespoons shortening (⅓ cup plus 1 tablespoon) I prefer butter flavor shortening, see notes for all butter recipe
- ¼ cup ice water
Fruit Filling for 4 Pies
- 2 cups prepared fruit pitted, diced, peeled, etc.
- 2 tablespoons sugar- brown or white use more or less depending on sweetness of fruit
- 2 tablespoons flour again, more if your fruit is super juicy like cherries, less if it’s pretty dry
- 1 tablespoon butter divided between the pies
- additional spices or flavorings as desired cinnamon, nutmeg, vanilla and almond extract, citrus zest etc.
Crumb Topping (for 4-6 pies)
- ¼ cup brown sugar
- ¼ cup flour
- 2 tablespoons oats
- ¼ teaspoon cinnamon
- 3 tablespoons cold butter
Optional Finishing Options (Apply before Freezing or Baking)
- melted butter or egg wash brush over tops
- sanding sugar or granulated sugar sprinkle over butter or egg wash
Instructions
Make Pie Dough (Or Use Store Bought)
- Combine flour and salt in a medium-sized bowl. Add shortening in small cubes. Cut in shortening with pastry cutter or two butter knives until you get pieces that are about pea-sized.
- Start sprinkling the ice water by about a tablespoon at a time over the flour/shortening mixture. Very, very gently, turn the dough with your fingers so it gets exposed to the water. You’re not mixing, just trying to moisten all of the flour/shortening mixture. Gradually, all of the flour mixture will be moistened.
- Gently pat the dough into a ball (it should come together easily but not be sticky) Wrap in plastic wrap and refrigerate at least 30 minutes or until ready to use. When ready to use, handle as little as possible according to recipe directions.
Make a Topper and Line the Jar
- (Skip this step if you're using a crumb topping.) Roll out a small handful of dough. This is just for the tops of your pies, so eyeball about that much. Grab the ring part of your jar and use that as your cookie cutter. Cut out 4 tops and set aside.
- Use the rest of the dough to line the jars. (No, you do not need to grease them) No rolling required! Just take little pieces and press them in. Make sure it’s pressed all the way up to the top of the jar, or pretty close to it.
Fill the Pies
- If making your own filling, combine prepared fruit with sugar, flour, and spices or flavorings you desire. You can add a little more or less sugar and flour depending on how sweet and juicy your fruit is. If your filling seems extra juicy, give it another sprinkle of flour to help thicken things up.
- Divide the filling among 4 jars (about 1/2 cup each).
- Dot each pie with ¼ tablespoon of butter.
Top your Pies – Crust Option
- Make sure your dough “lid” has a vent so steam can escape. You can use a knife to make a couple of slits or a tiny cookie cutter to make it decorative.
- When your topper is ready, slip it onto the top of the pie. It will be large enough that the outside edge goes up the side of the dough-covered jar a bit. Then use your finger, or a fork, to press the 2 pieces of dough together to seal.
- You can also cut strips to make a mini lattice crust.
- ** Optional step here that I HIGHLY recommend: Brush pie tops with butter (or an egg wash_ and sprinkle with sugar at this point. Yumminess highly intensified!
Top Your Pies – Crumb Topping Option
- Combine sugar, flour and cinnamon. Cut in cold butter until the mixture looks crumbly. Add oats and stir to combine.
- Divide among pies.
Freeze
- When your pies are all done and topped, place metal lids back on and seal them tight.
- Then pop these little cuties in the freezer. There they will stay until you find yourself having an insatiable craving for home-baked goodness.
Bake From Frozen
- To prevent thermal shock, place frozen pies on a cookie sheet in a cold oven, then set the oven to 375°F. This will allow the jars to warm slowly (although, if I'm being honest I always put them straight in a hot oven and have never had a jar break).
- Once the oven is at temperature, bake for 50-60 minutes, or until the tops are golden brown and the middles are bubbly.
Bake Fresh
- If baking fresh pies, preheat the oven to 375°F.
- Place pies on a baking sheet and bake for about 45 minutes, or until crust is golden brown and middles are bubbly.
Notes
- These little pies stay ready-to-bake in the freezer for up to 2-3 months.
- After baking, cover and cooled leftovers with their lids and store at room temperature for up to 24 hours or in the fridge for 2-3 days.
- All Butter Pie Crust Recipe: Use the recipe found in this Galette Post for an all-butter crust.


Questions & Reviews
Hayley- sure, you can put anything in here!
Oh my GOSH! These are the most amazing little things I've seen in a long time! I think I'll make up a batch for emergency I-just-remembered-it's-your-birthday-today moments.
What a great gift idea! I will be making these this holiday season.
Also, I wanted to buy one of those cute t-shirts for my son for Christmas (dirt that wiggles), but I can't seem to find the link on your blog anymore. What is it again?
Hey gals! Its your picky friend Hayley. I am always trying to change up the recipe…sorry. But I just don't like cooked fruit. Do you think I could a non fruit filling?
How do you feel about nuts and coconut Hayley? This is my alltime favorite non-fruit pie (and I’ve made it without coconut before, no problem)
http://allrecipes.com/recipe/lubys-german-chocolate-pie/
OK Sara. These are the cutest thing ever!!
Found through Lolly's site. Love your blog! The pie in a jar is fantastic! I will be doing this!
What a wonderfull, yummy idea!!!! Sounds good to me. I'm definitely going to make these.
Sandra
Ok, I have done mini pies before but these are awesome!! I love it when you can bake right away or freeze some for later. Makes the effort so much more worth the while if you ask me. Like a 2 for 1. Thanks for sharing this fabulous idea! I wonder can you do something like pumpkin pie this way? OOOO or cheesecake?
Katrina
I came over from dear Lolly's and am SO GLAD I DID!!! I want to make a million of these, RIGHT NOW.
THANK YOU!!!!!
This is such a cute idea!!!
Love your blog!!!!!!!!