 It seems like we’re always getting requests for an awesome whole wheat bread recipe. We (okay, I) have put this off for a long, long time and I haven’t been entirely sure why. After some careful self-analysis, here is my list of potential reasons why I haven’t jumped straight onto the homemade whole wheat bread bandwagon:
1) I am lazy.
2) Committing to making my own bread and not buying it at the store gives me hives.
3) Even though homemade whole wheat bread tastes better than what you’d find at your average grocery store, I’ve had a hard time finding a recipe where the taste made it worth eschewing my laziness or risking commitment-induced hives.
4) When I lived in Utah, it was easy to find ingredients to make homemade whole wheat bread. Now I have to order wheat (and dough enhancer if I want to use it, but I’ve weaseled my way around that one) and vital wheat gluten can be expensive and it’s only available at one grocery store where I live.
5) Even though I truly think grinding my own wheat makes the bread taste better, grinding wheat can be messy (and, when I am involved, usually is). I don’t like cleaning up wheat dust. Therefore, the thought of dragging out my wheat grinder also has the potential to give me hives. I think I may need therapy.
However, we recently were invited to try Bosch’s Universal Plus mixer and I decided that I needed to get over my issues. It’s been a long time coming. I’m making progress (although I’m still not prepared to commit to making my own bread 100% of the time).
I really, really wanted to give you guys an awesome whole wheat bread recipe. Here were my requirements:
1) The recipe makes a lot of loaves. Given my propensity toward hive-iness, I figure the less I have to make bread the better.
2) It has to be big enough for a sandwich or toast. None of this namby pamby 3″ tall bread.
3) Whole wheat bread can be dense and heavy. I didn’t want mine to be dense and heavy.
4) Homemade whole wheat bread can be bland. I wanted mine to taste awesome.
5) I didn’t want this recipe to take all fricking day. Because, let’s face it–pretty much all of us have better things to do.
I ended up adapting a whole wheat recipe from Bosch for a few reasons. First, I had made different variations of it before and I liked it (it’s kind of the go-to recipe for people who make their own whole wheat bread exclusively). Second, it only has one rise; it goes straight from the mixer into the bread pans, where it rises, and then goes into the oven. That shaves off a good hour right there.
However. Because I’m neurotic and a meddler and can’t leave things alone, I made quite a few tweaks. And I think they’re awesome tweaks, so I’m going to share them with y’all.
One thing about whole wheat flour–you don’t need to grind your own wheat. I have a WonderMill and, like my gym membership, I feel a lot of guilt when it goes unused for long periods of time. Plus, I really do think you wind up with better-tasting (and supposedly more healthful) wheat. Like I said, there’s nowhere for me to buy wheat berries locally, so I order hard white wheat (in spite of the pretty packaging, I’ve found it to be the best price online for hard white wheat). Why hard white wheat? I think it’s milder and softer than red wheat. I don’t like red wheat. I think bread made with red wheat is heavy and it makes me feel deprived and like I need Wonder Bread to balance it all out.
Speaking of products, I’m talking about a lot of specific brands in this recipe and I just want to disclaim (can I say that?) that we did receive Bosch mixers and attachments to try out (and this is a girl who owns 2, count ’em, t-w-o KitchenAid mixers), but everything else I mention is stuff I’ve bought my very own self. Just so you know I’m coming from an honest place. We might have a little giveaway going on tomorrow, and I’ll talk a little more about my feelings on Bosch mixers, but I will say here and now that if your husband wants to buy you either one for Mother’s Day/birthday/Christmas/for being awesome, he can’t go wrong. They’re both awesome and both have different strengths and weaknesses (although you’ll find rabid fans of both).
Anyway. I bet you just wish I’d shut up and share with you my recipe. And so I will.
Place 9 cups of whole wheat flour (freshly ground, if possible) into the bowl of a heavy-duty mixer. Enter the KitchenAid/Bosch debate. This is a LOT of flour, and you’ll be adding more, so if you’re using a KitchenAid, double check the maximum amount of stuff your machine can handle.
 Add 2 1/2 tablespoons of bread machine yeast.
 In case you didn’t know, I love bread machine yeast.
 If you don’t want to use bread machine yeast, just make sure you’re using instant or fast-acting yeast.
Mix the flour and yeast together. Add 5 3/4 cups warm (about 105-115 degrees F) water…
 Mix together until smooth. Cover and let it rise for 15-20 minutes or until light and spongey.
 Add 2 tablespoons table salt, 1/2 cup (1 stick) melted unsalted butter, 2/3 cup honey, and 1/4 cup plain Greek yogurt.
 You’ll also need 2 heaping tablespoons of vital wheat gluten.
 Before you start sending me emails, yes, you need it. No, this recipe is not gluten-free. Yes, I did just tell you to add gluten to your bread. Can we all be friends? Vital wheat gluten is really necessary in whole wheat breads because the whole wheat tends to be so heavy that the dough needs a boost to rise and not be like those brick-like whole wheat monstrosities we were often forced to eat as children when our mothers were figuring out this whole whole wheat bread thing. So yeah, add that, too.
Mix the added ingredients into the yeast/flour mixture until smooth. Add an additional 3-6 cups of flour, 1 cup at a time (until you start thinking you might be getting close, then reduce it by 1/2 cup). It’s hard, nay, impossible to give you an exact flour measurement because it can vary day by day, even in the same location. However, watch for the dough to start pulling together, away from the sides of the bowl. When it barely sticks to your finger (turn off the mixer first, silly!), you’re good to go. Let the mixer knead the dough for 5 minutes.
Spray 4 heavy-duty 9×5″ bread pans with non-stick cooking spray. I use and love, love, love these pans:
 I bought them on Amazon and yes, they are a little spendier than your average bread pans. But if you’re serious about making you’re own bread, they are fabulous at retaining heat, giving you a nice, smooth, evenly-browned loaf of bread .
Transfer the dough from the mixer to a surface lightly sprayed with non-stick cooking spray. Spray your hands, too (it’ll make your life easier, I promise). Press into an even circle and then divide the dough into equal fourths. The dough should be very easy to work with, especially with the non-stick cooking spray. Press each dough segment into a rectangle about 8 1/2-9″ long and then roll it up. Place each “log” into the prepared pans.
 Cover with a clean towel and allow to rise until it is over the top of the pan (about 45-60 minutes).
 Carefully place all the pans on the middle rack of an unheated oven. Turn the oven on to 350 and bake for 32-40 minutes or until golden brown on top and sound hollow-ish when you knock on them. If you have an instant-read thermometer, it should read about 200 degrees F.
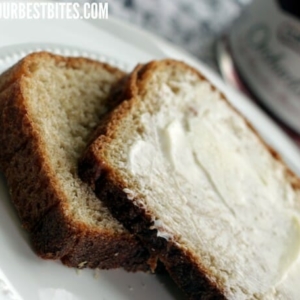
Remove the loaves from the oven and run a stick of cold butter over the tops of the bread.
 Allow to cool and then remove from the pans.
 These loaves freeze beautifully. You can use gallon-sized Ziploc bags (you may have to cut the ends off), or you can buy bread bags. Again, if you live somewhere where lots of people make their own bread, you might be able to buy them locally. Otherwise, these bags from King Arthur Flour are fabulous.
Just be sure and save one loaf of bread for sandwiches. And snacks. And bread and butter and jam.


Makes 4 9×5″ loaves.
Okay, peeps, I knew there would be lots of questions on this post, so I’ll do my best to answer the most prevalent ones I’ve seen so far. Feel free to bring any more to my attention (nicely…please… 🙂 )
Q: Do you REALLY need vital wheat gluten?
A: Some people are successful at making whole wheat bread without it. However…part of our job is making our recipes something that beginners to experts can make, and can make well on a consistent basis. Because of variations in bread-making experience, wheat quality, different types of wheat, whether you grind it yourself or buy the flour at the store, elevation, and about a million other factors, there’s lots and lots of potential for this recipe to fail. Vital wheat gluten helps with that. It’s not going to hurt you or your bread (unless, like a commenter mentioned, you’re allergic or have Celiac Disease), but it can help level out some of those problematic factors, so I guess my thing is why not add it, you know?
Q: What’s with the Greek yogurt?
A: It adds flavor, moisture, and, like adding buttermilk or sour cream to baked goods, it improves the texture of the finished product. I’m using it in place of dough enhancer here.
Q: I have a KitchenAid. Can I use it to make bread?
A: Yes, especially if you have a pro-series mixer. That said, you’ll want to keep an eye on your machine, especially near the end of the kneading cycle. If it smells “machiney” or appears to be straining or overheating, turn it off and finish kneading it by hand.
Q: I don’t have a heavy-duty mixer. Can I make it by hand?
A: Yes, absolutely! During the final kneading, just double the kneading time. Also, there’s a tendency when making bread without a mixer to add too much flour because you can really feel the moisture of the dough. Just realize that as time goes on and the longer the bread is kneaded, it will become less and less sticky, so try and be patient before adding too much flour.
Q: You’re paying way too much for your wheat! Why don’t you get it at an LDS Cannery?
A: Our closest cannery is over 4 hours away, so it would cost me over $150 in gas, plus food and the cost of a hotel (I’ve done the there-and-back-in-a-day trip twice and both of those were very, very bad days), so $45 for a bucket of wheat is WAY more affordable for me.
Honey Whole Wheat Bread
Ingredients
- 12-15 cups whole wheat flour preferably hard white wheat
- 5 3/4 cups warm 105-115 F water
- 2 1/2 tablespoons bread machine or instant yeast
- 2 tablespoons table salt
- 1/2 cup unsalted butter melted
- 2/3 cup honey
- 1/4 cup plain Greek yogurt
- 2 heaping tablespoons vital wheat gluten
Instructions
- Mix 9 cups wheat flour and yeast in the bowl of a heavy-duty mixer. Add 5 3/4 cup warm water and mix well. Cover and allow to rise for 15 minutes.
- Add salt, honey, melted butter, yogurt, and vital wheat gluten. Mix well. Add remaining 3-6 cups of flour, mixing the dough at low speed, until the dough pulls away from the sides of the bowl and the dough barely sticks to your finger. Allow the mixer to knead the dough for an additional 5 minutes.
- While the dough is kneading, spray 4 9x5" bread pans with non-stick cooking spray. Set aside. Spray a work surface and your hands with non-stick cooking spray.
- Turn the dough onto the prepared work surface. It should be very easy to work with. Press the dough into an even circle or square and divide the dough into 4 equal pieces. Press the dough into a rectangle that is about 8 1/2-9" on the long side. Roll it into a smooth log and place into a prepared pan. Repeat with remaining dough pieces. Cover and let rise for 45-60 minutes or until the dough is rounding over the tops of the pans.
- Carefully place the pans onto the middle rack of a cold oven. Turn oven onto 350 degrees and bake for 32-40 minutes or until the tops are golden brown and, if you're feeling awesome, an instant-read thermometer reads 200 degrees. Remove from oven and run a stick of cold butter over the tops of the bread. When cool, remove from pans. Use immediately or freeze loaves for future use.


Questions & Reviews
The bread is now in the oven and I just realized that I forgot to let the dough rise another hour ): All that work for nothing. Darn it!!!
I am not LDS any more, but I still purchase my whole wheat berries from the LDS church web site. Least expensive per pound price and FREE shipping, delivered in #10 cans. A great deal!
Thanks for the site and recipes!
Jack
Thank you so much for this receipe,this is the best home made bread I have ever tasted, in fact it is the best bread ever that I have tasted. This receipe was made with the Bosh Mum86 Professional mixmaster, it is also the best mixmaster I haver ever owned.
Hi again. I made the bread and during baking, the tops fell… not all the way under, but the tops are wavy… any ideas on what went wrong?
Hi. Have you ever tried grapeseed oil or another type of oil in place of the butter? I am just wondering.
Do you all have a receipe for white bread? And what if my bread didn’t rise as pretty? Where do you think I went wrong?
SO EXCITED to try this. I can TOTALLY relate to everything you described. And, I’m using benedryl on my hives right now, as I am considering this. But, I WANT TO DO IT!! There, I said it. And, I’m ordering the bread pans. TODAY.
Question: Why 9″ pans. I see larger ones on Amazon. I want to be able to make big sandwiches for my big teenage man-cubs. I’m not feeding babies, here. So, is 9″ the best for big sandwiches? I am looking on Amazon, and I see 13″, 8.5″, 9″, 10″ – Goodness! What do I buy? I happen to think size does matter, here. Help?
NOW I know how to have normal looking loaves!!! Thank you SO much! This was a very easy recipe and my loaves look beautiful!!! You guys are AMAZING!
I have dough enhancer but don’t usually have greek yogurt. Can I substitute it? Should I add more oil or butter as well? Thanks for a great recipe! I love homemade bread!
FYI You can get white wheat shipped from the LDS online store for $30 for six #10 cans. Also Honeyville Grain sends discounts on their email lists from time to time and you can get a great deal on Vital Wheat Gluten. Great way to save some money if you decide to take the plunge into making your own bread regularly. 🙂